жЬАеЊМжЫіжЦ∞: 2020-01-17
зЫЃйМД
- CLI
- forticlient
дїЛзіє
Get hardware module
get system status
Version: FortiGate-61F v7.2.0,build1157,220331 (GA.F)
...
CLI
abort Exit an edit shell without saving the configuration.
end Save the changes you have made in the current shell and leave the shell. Every config command must be paired with an end command.
next Save the changes you have made in the current shell and continue working in the shell.
delete Remove an entry from the FortiAnalyzer configuration.
purge Remove all entries configured in the current shell.
set Assign values.
unset Reset values to defaults.
DHCP
execute dhcp lease-list
Ping
# дЄНжЦЈ ping
execute ping-options repeat-count <repeats>
execute ping n.n.n.n
address иИЗ addrgrp Object
show firewall address
show firewall addrgrp
i.e.
show firewall addrgrp Access_FW_Panel
config firewall addrgrp
    edit "Access_FW_Panel"
        set uuid 8a09afe8-7d16-51ee-3912-7497d9ac4c1e
        set member "admins_ip"
    next
end
NAT (Port forwarding)
Example: Port forward 8080/TCP -> 192.168.13.201:8080(HTTP)
By CLI
1) и®≠еЃЪ VIP
show firewall vip
config firewall vip
    edit "hfs_8080"
        set uuid ...
        set comment "hfs"
        set service "service_8080"
        set extintf "wan2"
        set portforward enable
        set mappedip "192.168.13.201"
        set mappedport 8080
    next
end
* "set service" = "set extport"
еЬ® GUI и¶Б Enable "Optional Filters" еЕІзЪД "Services" жЙНиГљдљњзФ® "set service"
еР¶еЙЗи¶БзФ® "set extport 8080"
* зХґ Services жЬЙе§ЪеАЛ port жЩВжЬГжЬЙи®≠еЃЪеЫ∞йЫ£. еЫ†зВЇдЄНжШѓ 1:1 mapping
* е¶ВжЮЬжЬЙеєЊеАЛ port и¶Б forwarding, еїЇи≠∞зµДжИР vipgrp
i.e.
# member жШѓ "config firewall vip" еЕІзЪДи®≠еЃЪ
config firewall vipgrp
    edit "idrac_esxi_vip_group"
        set interface "wan1"
        set member "idrac_esxi-5900" "idrac_esxi-9443"
    next
end
2) Policy
show firewall policy
    edit 8
        set name "NAT_wan2_8080"
        set uuid ...
        set srcintf "wan2"
        set dstintf "vlan13"
        set srcaddr "all"
        set dstaddr "hfs_8080"
        set action accept
        set schedule "always"
        set service "service_8080"
    next
* srcintf = package йА≤еЕ•зЪД NIC, dstintf дњВжМЗ package еЗЇйВ£ NIC
* dstaddr жШѓ vip зЪД name
By GUI и®≠еЃЪ
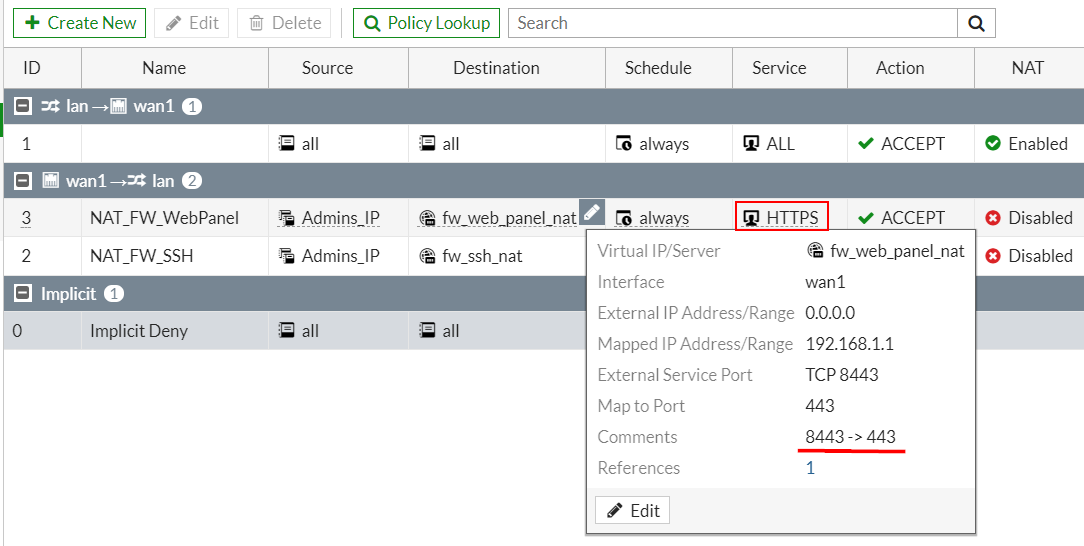
Example: Port forward 8443 -> 192.168.1.1:443(HTTP)
# Wan
- Incoming Interface to your Internet-facing interface
- Destination Address to the VIP group
# Lan
- Outgoing Interface to the interface connected to the server
- Service и¶Бе°Ђ "HTTPS", дЇ¶еН≥дњВе°ЂзЫЃзЪДеЬ∞зЪД Port !!
# Other
- NAT Disabled for this so that the server sees the original source addresses of the packets it receives.
- Comments жЬАе•љеѓЂињФеТ© port иљЙеТ© port
COM port
# 60E
Bits per second  9600
Data bits        8
Stop bits        1
Parity           None
Flow control     None
Useful setting
Change Admin Port
config system global
    set admin-sport 7734
    set admin-ssh-port 2345
end
Setting the idle timeout time for GUI (Default: 30m)
config system global
    set admintimeout 60
end
Setting the idle timeout time for SSH (Default: 120s)
config system global
    set admin-ssh-grace-time 3600
end
"show" without "more"
config system console
    set output standard
end
reboot
execute reboot
reset
execute factoryreset
show command
# Get NIC Info.
show system interface
...
    edit "lan"
        set vdom "root"
        set ip 192.168.1.99 255.255.255.0
        set allowaccess ping https ssh http fgfm fabric
        set type switch
        set role lan
        set snmp-index 8
    next
..
show system interface | grep wan
...
    edit "wan1"
        set role wan
    edit "wan2"
        set role wan
...
# Print all the configurations
show full configuration
NIC Info.
get system interface physical
#overview of hardware interfaces
get hardware nic <nic-name>
# details of a single network interface,
# same as: diagnose hardware deviceinfo nic <nic-name>
Allow remote management
config system interface
    edit <interface_name>
    set allowaccess <access_types>
end
i.e.
set allowaccess ping https ssh http fgfm fabric
show
# Unlike get, show does not display settings that are assumed to remain in their default state.
show system interface
show system physical-switch
config system physical-switch
    edit "sw0"
        set age-val 0
    next
end
show system virtual-switch
config system virtual-switch
    edit "fortilink"
        set physical-switch "sw0"
    next
    edit "management"
        set physical-switch "sw0"
        config port
            edit "internal6"
            next
            edit "internal7"
            next
        end
    next
end
show system switch-interface
config system switch-interface
    edit "lan"
        set vdom "root"
        set member "vlan99" "wifi" "management"
    next
    edit "wqt.root"
        set vdom "root"
        set member "wqtn.7.wifi"
    next
end
show system dns
config system dns
    set primary 208.91.112.53
    set secondary 208.91.112.52
end
show system admin
config system admin
    edit "admin"
        set accprofile "super_admin"
        set vdom "root"
        set password ENC ...
    next
end
show system global
Disk CMD
execute disk list # List disk devices and partitions.
execute disk scan # Scan a partition and fix errors.
execute disk format N # Format a partition.
* дЄНжШѓжЙАжЬЙеЮЛиЩЯйГљжЬЙ
* reboots the system if a reboot is required.
HA cluster
* Make sure that ALL FortiGates in the cluster must have the same level of licensing
On the primary FortiGate (Master)
1) System > Settings >
Set "Host name" to identify this as the primary
2) System > HA >
a) Mode: Active-Passive
b) Set "Device priority" to a higher value than the default
c) Set Group name & Passwordp
e) Heartbeat interfaces (port1, port2 ....)
е¶ВжЮЬжЬЙе§ЪеАЛ NIC жЩВе∞±и¶Б Set "Heartbeat Interface Priority"
Setting
Heartbeat interfaces
A best practice is to use interfaces that don't process traffic(but this is not a requirement)
(the HA heartbeat interfaces must be on the same broadcast domain)
Session pickup
When session-pickup is enabled, the FGCP synchronizes the primary unit's TCP session table to all cluster units.
As soon as a new TCP session is added to the primary unit session table, that session is synchronized to all cluster units.
This synchronization happens as quickly as possible to keep the session tables synchronized.
If session pickup is enabled, you can use the following command to also enable UDP and ICMP session failover:
config system ha
    set session-pickup-connectionless enable
end
Configuring the backup FortiGate
1) reset the new backup FortiGate to factory default settings
execute factoryreset
2)
Duplicate the primary FortiGate HA settings, except set the Device Priority to a lower value (for example, 50) and do not enable override.
config system global
    set hostname Backup
end

config system ha
    set mode a-p
    set group-id 100
    set group-name My-cluster
    set password <password>
    set priority 50
    set hbdev lan4 200 lan5 100
end
Test & Checking failover cluster operation
CLI: diagnose sys ha checksum cluster
HA Status dashboard widget
System > HA
* When the primary FortiGate rejoins the cluster, the backup FortiGate should continue operating as the primary FortiGate.
1) powered off
2) unplug the primary FortiGate's Internet-facing interface
FortiGate Clustering Protocol (FGCP) High Availability cluster.
* The FGCP does not support using a switch interface for the HA heartbeat.
=> you can use the wan1 and wan2 interfaces for the HA heartbeat.
Override
If you keep override enabled, the same FortiGate always becomes the primary FortiGate.
* Enabling override and increasing the device priority means this FortiGate always becomes the primary unit.
Upgrading the firmware
Upgrading on the primary FortiGate automatically upgrades the firmware on the backup FortiGate.
Both FortiGates are updated with minimal traffic disruption.
widget : System Information
Monitor interfaces
redundant interface as a single interface
If only some of the physical interfaces in the redundant interface fail or
become disconnected, HA considers the redundant interface to be operating normally.
Management Interface Reservation
A different IP address and administrative access settings can be configured for this interface for each cluster unit.
( access both members on separate IP address via SSH or GUI )
This simplifies using external services such as SNMP to monitor and manage the cluster units.
* Configuration changes to the reserved management interface are not synchronized to other cluster units.
* Both management interfaces on Master and Slave needs to be same
Setting
- Interface: interface used for management access
- Gateway: IPv4 address of gateway in case access device not from same subnet and router is in middle.
- Destination subnet: In case access device from remote subnet, specify subnet or use wildcard subnet 0.0.0.0/0 (default setting)
# Setting
show system ha
config system ha
   set ha-mgmt-status enable
    config ha-mgmt-interfaces
        edit 1
            set interface "internal5"
        next
    end
    ...
end
# until cluster will be in-sync
show system interface internal5
config system interface
    edit "internal5"
        set ip 172.16.0.1 255.255.255.0
        set allowaccess ping https ssh http
        set type physical
        set snmp-index 15
    next
end
fortilink interface
FortiGate units can be used to remotely manage FortiSwitch units,
which is also known as using a FortiSwitch in FortiLink mode.
FortiLink defines the management interface and the remote management protocol between the FortiGate and FortiSwitch.
Auto-discovery of the FortiSwitch ports
config switch interface
    edit <port>
    set auto-discovery-fortilink enable
end
* default: enabled
Split Internal Ports
software switch
A software switch is a virtual switch that is implemented in software instead of hardware.
Software Switch is used to form a simple bridge between two or more physical or wireless FortiGate interfaces.
They are made up of "member" interfaces.
- traffic is processed by CPU
CLI: config system switch-interface
virtual switch interfaces
Virtual switch feature enables you create virtual switches on top of the physical switch(es) with designated interfaces/ports
When traffic is forwarded among interfaces belonging to the same virtual switch,
the traffic doesn't need to go up to the software stack, but forwarded directly by the switch.
CLI: config system virtual-switch
Hardware Switch mode
- A hardware switch is a virtual interface that groups different interfaces together,
allowing a FortiGate to treat the group as a single interface.
- traffic is processed by asic
VLAN Switch Mode
- it's the same as a hardware switch
- define a trunk port
Which mode is your FortiGate in by default
System > Network > Interfaces
Locate the "lan" or "internal" interface in the Type column
Step
[1]
FW-A # config firewall policy
FW-A (policy) # show
config firewall policy
    edit 1
        set uuid ?-?-?-?-?
        set srcintf "lan"
        set dstintf "wan1"
        set srcaddr "all"
        set dstaddr "all"
        set action accept
        set schedule "always"
        set service "ALL"
        set nat enable
    next
end
FW-A (policy) # purge
[2]
config system switch-interface
show
config system switch-interface
    edit "lan"
        set vdom "root"
        set member "internal" "wifi"
    next
    edit "wqt.root"
        set vdom "root"
        set member "wqtn.7.wifi"
    next
end
edit "lan"
set member wifi
[3]
config system virtual-switch
show
config system virtual-switch
    edit "internal"
        set physical-switch "sw0"
        config port
            edit "internal1"
            next
            edit "internal2"
            next
            ...
FW-A (virtual-switch) # purge
Remark: Remove еАЛеИ• port
config system virtual-switch
    config port
    delete internal1
end
Admin ACL
# Per Account ACL
System > Administrators
in the web-based manager and selecting "Restrict login to trusted hosts"
# FortiManager Access (FMG-Access)
FMG-Access on the wan interface would be used for something like forticloud or fortimanager
Trusted hosts are configured when adding a new administrator by going to
# IP Level ACL
# Dual Wan
config firewall local-in-policy
    edit 1
        set intf "internal"
        set srcaddr "office_subnet"
        set dstaddr "all"
        set action accept
        set service "FW_MGT"
        set schedule "always"
    next
    edit 2
        set intf "wan1"
        set srcaddr "Access_FW_Panel"
        set dstaddr "all"
        set action accept
        set service "FW_MGT"
        set schedule "always"
    next
    edit 3
        set intf "wan2"
        set srcaddr "Access_FW_Panel"
        set dstaddr "all"
        set action accept
        set service "FW_MGT"
        set schedule "always"
    next
    edit 4
        set intf "any"
        set srcaddr "all"
        set dstaddr "all"
        set action accept
        set service "PING"
        set schedule "always"
    next
    edit 5
        set intf "any"
        set srcaddr "all"
        set dstaddr "all"
        set action accept
        set service "L2TP_Over_IPSec"
        set schedule "always"
    next
    edit 6
        set intf "any"
        set srcaddr "all"
        set dstaddr "all"
        set service "ALL"
        set schedule "always"
    next
end
* ж≤ТжЬЙ "set action accept" еН≥жШѓ deny
* PNG, VPN йГљжШѓзґУ local-in-policy
* The implicit deny policy must be placed at the bottom of the list of local-in-policies.
Configure DHCP on the FortiGate
Network > Interfaces > Edit
CLI
execute dhcp lease-list
DNS Server
# To enable DNS server options in the GUI:
Go to System > Feature Visibility
Enable "DNS Database" in the Additional Features section.
# To configure DNS server
Network > DNS Servers
DNS Service on Interface -> Create New
Mode: Recursive / Non-Recursive / Forward to System DNS
DNS Filter:
filters the DNS request based on the
* FortiGuard domain rating
* blocks the DNS request for the known botnet C&C domains.
* External IP block list: allows you to define an IP block list to block resolved IPs that match this list.
Vlan
еЬ® fortigate и®≠еЃЪ vlan еЊМ, еЃГзЪД port е∞±жЬГжШѓ VLAN trunk (802.1Q trunk)
* ж≤ТжЬЙ port base vlan
- You can define VLAN subinterfaces on all FortiGate physical interfaces.
- You can add multiple VLANs to the same physical interface on a FortiGate.
- You can add VLAN subinterfaces with the same VLAN ID to different physical interfaces.
Setting Example
config system interface
    edit "vlan_11"
        set description "VLAN 11 on internal1 interface"

        set vdom root

        set mode static
        set ip 192.168.11.1 255.255.255.0

        set type vlan
        set vlanid 11

        set interface internal1

        set allowaccess ping https ssh

    next
end
set vlanforward
- enable Enable traffic forwarding.
- disable Disable traffic forwarding.
When disabled, each VLAN on this physical interface can send traffic only to the same VLAN.
enabled and will forward VLAN traffic to all VLANs on this interface.
Wifi
Tunnel mode(default)
R---AP---Client
|~~Tunnel~~|
a wireless-only subnet is used for wireless traffic.
(You can only quarantine an SSID that is in Tunnel Mode.)
Bridge mode
R---AP
    Client
the Ethernet and WiFi interfaces are connected (or bridged),
allowing wired and wireless networks to be on the same subnet.
static route
show router static
config router static
    edit 1
        set gateway 192.168.99.1
        set device "wan2"
        set comment "wan2 gw"
    next
end
Interface status
diag net interface list
if=lo family=00 type=772 index=1 mtu=16436 link=0 master=0
ref=8 state=start fw_flags=0 flags=loopback

...

if=wan1 family=00 type=1 index=6 mtu=1500 link=0 master=0
ref=156 state=off start fw_flags=0 flags=up broadcast run promsic multicast
Policy Routes
In order to get the "Policy Routes" option on GUI, first enable the "Advanced Routing" in the "feature visibility"
- GUI: Firewall GUI -> Network -> Policy Routes
- CLI: config router policy
Remark
- Always configure a default route.
-
Add blackhole routes for subnets reachable using VPN tunnels.
(This ensures that if a VPN tunnel goes down, traffic is not mistakingly routed to the Internet unencrypted.)
Stop policy route
set action denyIf no policy route matches the packet, then the FortiGate unit routes the packet using the static routing table.
- policy route
- static routing table
Show
show router policy
config router policy
    edit 1
        set input-device "vlan11"
        set srcaddr "vlan11_net"
        set dstaddr "all"
        set output-device "wan1"
    next
    edit 2
        set input-device "vlan12"
        set srcaddr "vlan12_net"
        set dstaddr "all"
        set output-device "wan1"
    next
    edit 3
        set input-device "lan"
        set srcaddr "lan_net"
        set dstaddr "vlan11_net" "vlan12_net"
        set action deny
    next
    edit 4
        set input-device "lan"
        set srcaddr "lan_net"
        set dstaddr "all"
        set output-device "wan1"
    next
end
Checking
diag ip proute match <destination address> <source address> <interface name> <protocol> <destination port>
i.e.
# vlan11 to wan
diagnose ip proute match 8.8.8.8 192.168.11.101 vlan11 0 0
dst=8.8.8.8 src=192.168.11.101 iif=25 protocol=0 dport=0
id=00000001 type=Policy Route
seq-num=1
# lan to vlan
diagnose ip proute match 192.168.12.101 192.168.1.101 lan 0 0
Remark
Protocol number
- icmp 0
- udp 17
- tcp 6
Redundant Internet with basic failover
1. Connecting your ISPs to the FortiGate
2. Creating redundant firewall policies
3. Creating redundant routes
4. Configuring the link monitor
Dual Wan (Basic)
No redundancy nor load sharing:
in the scenario where lan1 has to be routed via WAN1 and lan2 via WAN2,
1. distance and priority
Both Internet lines (wan1, wain2) must same distance and priority
config system interface
    edit wan1
    set mode pppoe/dhcp
    set distance 10
    next
end
2. policies
policies from lan1 -> WAN1 and lan2 -> WAN2.
3. policy routes
policy routes must be in place (source lan1 via wan1 and lan2 via wan2) and
иІ£йЗЛ
If two routes have the same administrative distance and the same priority,
then they are Equal Cost Multi Path (ECMP) routes.
Note that defining no 'priority' in route 1 will set a default value of 0.
FortiGate unit will (by default) prefer the route associated with the dynamic interface.
By default, static routes have an administrative distance of 10
(the distance to the next-hop router)
and routes associated with dynamic interfaces have an administrative distance of 1
(the distance to the default gateway retrieved from the DHCP or PPPoE server).
Checking
# view the routing table
get router info routing-table all
Routing table for VRF=0
Codes: K - kernel, C - connected, S - static, R - RIP, B - BGP
       O - OSPF, IA - OSPF inter area
       N1 - OSPF NSSA external type 1, N2 - OSPF NSSA external type 2
       E1 - OSPF external type 1, E2 - OSPF external type 2
       i - IS-IS, L1 - IS-IS level-1, L2 - IS-IS level-2, ia - IS-IS inter area
       * - candidate default

S*      0.0.0.0/0 [5/0] via 192.168.88.1, wan1
                  [5/0] via 192.168.99.1, wan2
C       10.253.240.0/20 is directly connected, wqt.root
C       169.254.1.0/24 is directly connected, fortilink
C       192.168.1.0/24 is directly connected, lan
C       192.168.11.0/24 is directly connected, vlan11
C       192.168.12.0/24 is directly connected, vlan12
C       192.168.13.0/24 is directly connected, vlan13
C       192.168.88.0/24 is directly connected, wan1
C       192.168.99.0/24 is directly connected, wan2
Dual Wan (SD-WAN load balancing)
GUI: Network > SD-WAN Rules
Edit -> Load Balancing Algorithm
- Spillover
- Volume
-
Sessions
Link monitor
Adding a link health monitor is required for routing failover traffic.
A link health monitor confirms the connectivity of the device’s interface
config system link-monitor
edit wan1
 (wan1) #get
  set name wan1
  set server 8.8.4.4
  set protocol ping
  set gateway-ip 172.25.176.1
  set interval 5
  set timeout 1
  set failtime 5
  set recoverytime 5
  set update-cascade-interface enable
  set update-static-route enable
  set status enable
end
Zones
Zones are a group of one or more FortiGate interfaces
* еЬ® Dual Wan жЩВ, е¶ВжЮЬеЕ©еАЛ Wan еїЇзЂЛжИР zone, йВ£ policy route жЬГеФФ work
To create a zone
GUI
System > Network > Interface
CLI
config system zone
edit WAN_ZONE
    set interface wan1 wan2
    end
end
Backup Config
CLI
FW-A # execute backup config flash
Please wait...
Config backed up to flash disk done.
Enable SCP
FW-A # config system global
FW-A (global) # set admin-scp enable
FW-A (global) # end
GUI
https://192.168.77.1/ng/system/config/backup
Setting up FortiGuard DDNS
GUI
Network > DNS
enable FortiGuard DDNS.
CLI
config system ddns
  edit 0
    set ddns-server FortiGuardDDNS
    set ddns-domain "branch.float-zone.com"
    set use-public-ip enable
    set monitor-interface "wan1"
  end
end
DNS filter
Filter type
[1] (Free)
Botnet C&C domain blocking: blocks the DNS request for the known botnet C&C domains.
- FortiGuard Service continually updates the Botnet C&C domain list (Domain DB).
DNS safe search
- responds with the search engine's children and school safe domain
[2](жФґи≤ї)
FortiGuard Filtering: filters the DNS request based on the FortiGuard domain rating.
- The FortiGate must have a FortiGuard Web Filter license to use FortiGuard Category Based Filter.
[3](иЗ™еЃЪ)
# local (Default: Disable)
External dynamic category domain filtering: allows you to define your own domain category.
- External Resources provides the ability to dynamically import an external blacklist into an HTTP server.
Local domain filter: allows you to define your own domain list to block or allow.
External IP block list: allows you to define an IP block list to block resolved IPs that match this list.
DNS translation: maps the resolved result to another IP that you define.
How to configure and apply a DNS filter profile
0. Using a FortiGate as a DNS server
Network > DNS
Network > DNS Servers
1. To create or configure DNS Filter profile in the GUI:
Security Profiles > DNS Filter
2. To apply DNS Filter profile to the policy in the GUI:
Policy -> Item -> Security Profiles section
Botnet C&C domain blocking
Setting
Security Profiles ->DNS Filter
Enable "Redirect botnet C&C requests to Block Portal"
Options category > Redirect Portal IP
Test - Botnet C&C domain blocking
# botnet domain query blocked, redirect with portal-IP.
dig canind.co
;; ANSWER SECTION:
canind.co.              60      IN      A       208.91.112.55
Log & Report > DNS Query
Action = redirect
Message = Domain was blocked by dns botnet C&C
Check Fortigate DNS Server
diagnose test application dnsproxy 3
...
FDG_SERVER:208.91.112.220:53
...
execute ping 208.91.112.22
LICENSE
The FortiGuard DNS Rating Service shares the license with FortiGuard Web Filter
so you must have a valid Web Filter license for the DNS Rating Service to work
diagnose test application dnsproxy 3
LICENSE: expiry=2020-11-22, expired=0, type=2

# These lines show the functioning SDNS servers.
# Some "dns-server" lines show "secure=1 ready=1"
Inspection Mode
Flow-based
traffic flowing through the policy will not be buffered by the FortiGate
flow-based policy is to optimize performance and increase throughput.
If a file’s size is not present in the protocol exchange, the file 's size cannot be identified.
The flow-based policy will automatically block or pass the file (based on the configuration)
Proxy-based
the content payload passing through the policy will be inspected on a packet by packet basis with the very last packet held by the FortiGate until the scan returns a verdict
If a violation is detected in the traffic, a reset packet is issued to the receiver
(which terminates the connection)
This means that the packets for a file, email message, or web page will be held by the FortiGate until the entire payload is inspected for violations (virus, spam, or malicious web links).
=============
Inspection mode differences for antivirus
Application control
FortiGates can recognize network traffic generated by a large number of applications
Security Profiles > Application Control
Under Categories, left click the icon next to the category name to view a dropdown of actions:
Allow
Monitor
Block
Quarantine
View signatures
Port enforcement check
If the default network service is enabled in the Application Control profile, a port enforcement check is done at the application profile level, and any detected application signatures running on the non-standard TCP/IP port are blocked.
For example, SSH runs on port 22
Protocol enforcement
Protocol enforcement allows you to configure networking services (e.g. FTP, HTTP, HTTPS) on known ports (e.g. 21, 80, 443). For protocols which are not whitelisted under select ports, the IPS engine performs the violation action to block, allow, or monitor that traffic.
Antivirus
Flow-based antivirus offers higher throughput performance, while proxy-based solutions are useful to mitigate stealthy malicious codes.
- FortiGuard outbreak prevention for antivirus
- External malware block list for antivirus
# Check the antivirus statistics
diagnose ips av stats show
AV stats:
HTTP virus detected: 0
HTTP virus blocked: 0
SMTP virus detected: 0
SMTP virus blocked: 0
POP3 virus detected: 0
POP3 virus blocked: 0
IMAP virus detected: 0
IMAP virus blocked: 0
NNTP virus detected: 0
NNTP virus blocked: 0
FTP virus detected: 0
FTP virus blocked: 0
SMB virus detected: 0
SMB virus blocked: 0
# Reset the antivirus statistics to zero:
diagnose ips av stats clear
FortiGuard & License
Fortiguard is a subscription based service from Fortinet, where your Fortigate queries their servers in real-time for various services:
# To obtain/renew a FortiGuard antivirus license:
GUI: System > FortiGuard
FortiGuard outbreak prevention for antivirus
The hash signatures are obtained from external sources such as VirusTotal, Symantec, Kaspersky, and other third-party websites and services.
Debug CLI: diagnose debug rating
Rating requests are only sent to the server at the top of the list in normal operation.
Each server is probed for Round Trip Time (RTT) every two minutes.
IP Weight RTT Flags TZ Packets CurrLost TotalLost
Log Allowed Traffic
"Security Events" # default <- UTM
show up traffic log match UTM profile defined.
"All Sessions"
will include traffic log include both match and non-match UTM profile defined.
UTM = unified-threat-management
------
display by both the GUI and via CLI.
execute log filter device 0 # this will display logs from memory
0: memory
1: disk
2: fortianalyzer
3: forticloud
execute log filter category N
Available categories in FortiOS 6.2:
0: traffic
1: event
2: utm-virus
3: utm-webfilter
4: utm-ips
5: utm-emailfilter
7: utm-anomaly
8: utm-voip
9: utm-dlp
10: utm-app-ctrl
12: utm-waf
15: utm-dns
16: utm-ssh
17: utm-ssl
18: utm-cifs
19: utm-file-filter
show setting
show full-configuration log memory setting
config log memory setting
set status enable
set diskfull overwrite
end
show full-configuration log memory global-setting
config log memory global-setting
set max-size 19543244
set full-first-warning-threshold 75
set full-second-warning-threshold 90
set full-final-warning-threshold 95
end
show full-configuration log memory filter
config log memory filter
set severity warning
set forward-traffic enable
set local-traffic disable
set multicast-traffic enable
set sniffer-traffic enable
set anomaly enable
set voip enable
set filter ''
set filter-type include
end
Cheat List
get router info routing-table all
show router static
show router policy
---
show firewall policy
show firewall address
show firewall vip
---
show system interface
diag net interface list
show system switch-interface
show system virtual-switch
show system dhcp server
---
show system ha
---
execute dhcp lease-list
---
On-Net Status
config
    system dhcp server edit 1set interface port1
    set forticlient-on-net-status enable
end
an interface option that listens for connections from devices with FortiClient installed.
FortiTelemetry is the TCP/8013 protocol used between FortiClient and FortiGate,
FortiClient endpoint compliance will require all clients to have FortiClient installed in order to get access through the FortiGate.
After FortiClient is installed on an endpoint, FortiClient automatically launches and searches for a FortiGate
FortiClient Telemetry is connected to FortiGate, and FortiClient downloads a profile from FortiGate.
The profile contains the compliance rules and optionally some configuration information for FortiClient.
The compliance rules are used to configure endpoints for Network Access Compliance (NAC) and
to specify what happens when endpoints fail to meet compliance rules.
After receiving the profile, some settings in the FortiClient console are locked because they are controlled by the compliance rules and configuration information in the profile.
VDOM (Virtual Domains)
Virtual domains (VDOMs) are a method of dividing a FortiGate unit into two or more virtual units that function as multiple independent units.
(firewall policies and, in NAT/Route mode, VPN services)
When VDOMs are disabled on any FortiGate unit, there is still one VDOM active: the root VDOM.
It is always there in the background. When VDOMs are disabled, the root VDOM is not visible but it is still there.