жңҖеҫҢжӣҙж–°: 2019-06-05
Target
# Diagram
123.10(Client) --> 123.55(Server)
client1.local      server1.local
# Create image for target
truncate -s 1g /home/iscsi2.img
# Install tools
yum install targetcli -y
* tree-based layout
* a front end for viewing, editing, and saving the configuration of the Linux-IO (lio)
LIO and targetcli uses configFS for its configuration. All storage objects can be accessed and exported
mount | grep configfs
configfs on /sys/kernel/config type configfs (rw,relatime)
# interactive shell
targetcli
# е»әз«Ӣ backstores
# type: block, fileio, pscsi, ramdisk
# fileio: Allows files to be treated as disk images
# block: local disk block
# pscsi: local SCSI device of any type to be shared
# ramdisk: kernel memory to be shared as a block SCSI device
# Default: write_back=true
/backstores/fileio
/backstores/fileio> create u16 /home/pxe/iscsi/u16.img 20G
Using buffered mode.
Created fileio u16.
/backstores/fileio> status
Status for /backstores/fileio: 1 Storage Object
/backstores/fileio> ls
o- fileio ....................................................................................................... [1 Storage Object]
  o- u16 .............................................................................. [20.0G, /home/pxe/iscsi/u16.img, not in use]
# е»әз«Ӣ tpg (Target Portal Group)
Target Portal Group
a set of one or more storage system network interfaces that can be used for an iSCSI session between an initiator and a target.
The iSCSI protocol allows only one session between a specific iSCSI initiator port and a single portal group on the target.
# е®ғжңғиҮӘеӢ•е»әз«Ӣ portals (0.0.0.0:3260)
# IQN with TargetName
/iscsi
create iqn.2017-11.local.server1:t1
naming-authority = server.local -> local.server
# иЁӯе®ҡ network
/iscsi
iqn.2017-11.local.server1:t1/tpg1/portals
delete ip_address=0.0.0.0 ip_port=3260
create 192.168.123.55
# е»әз«Ӣ lun
жҠҠ image file еҒҡ lun
/iscsi/iqn.../tpg1/luns
create /backstores/fileio/shareddata
# иЁӯе®ҡ ACL (е°ҚжҮү client зҡ„ '/etc/iscsi/initiatorname.iscsi')
/iscsi/iqn.../tpg1/acls
create iqn.2017-11.local.client1
Remark
# Disable automatically maps LUNs to any created ACL
/> set global auto_add_mapped_luns=false
# дәәжүӢеҠ lun
/iscsi/target_iqn_name/tpg1/acls/initiator_iqn_name/
create mapped_lun=next_sequential_LUN_number [write_protect=1]
# save setting
/saveconfig
Remark
* exit жҷӮдәҰжңғ autosave
* Last 10 configs saved in /etc/target/backup
Configuration saved to /etc/target/saveconfig.json
# start & enable service
systemctl start target
systemctl enable target
# checking
yum -y install net-tools # зҚІеҫ— netstat
netstat -antp | grep 3260
netstat -ntp | grep 3260
tcp        0 131120 192.168.123.55:3260     192.168.123.56:51400    ESTABLISHED -
# fw
firewall-cmd --permanent --add-port=3260/tcp
firewall-cmd --reload
Block Device Lun
зӮә Block Device е»әз«Ӣ uuid / label
parted /dev/vdb
mklabel gpt
mkpart iscsi-disk 0% 100%
Model: Virtio Block Device (virtblk)
Disk /dev/vdb: 10.7GB
Sector size (logical/physical): 4096B/4096B
Partition Table: gpt
Disk Flags:

Number  Start   End     Size    File system  Name        Flags
 1      1049kB  10.7GB  10.7GB               iscsi-disk
blkid /dev/vdb1
/dev/vdb1: PARTLABEL="iscsi-disk" PARTUUID="e1937114-8bd9-413e-acef-5f4f118d2a7d"
/dev/disk/by-partlabel:
iscsi-disk
/dev/disk/by-partuuid:
e1937114-8bd9-413e-acef-5f4f118d2a7d
targetcli иЁӯе®ҡ
/backstores/block
create iscsi-disk /dev/disk/by-partlabel/iscsi-disk
Created block storage object iscsi-disk using /dev/disk/by-partlabel/iscsi-disk.
cd /iscsi/iqn.../tpg1/luns/
create /backstores/block/iscsi-disk
Disable Login
* Per targets setting
* Warning: With this setting everybody that knows the iqn of one of your clients (initiators) can access the target.
# Disable authentication so that any initiator can access LUN.
/iscsi/iqn.../tpg1> set attribute authentication=0
# Checking
/iscsi/iqn.../tpg1> get attribute authentication
authentication=0
Server иЁӯе®ҡ Credentials
/iscsi/.../tpg1> get auth
/iscsi/.../tpg1> set auth userid=<username in target>
/iscsi/.../tpg1> set auth password=<password in target>
Backup & Restore Setting
# Backup
# the file may contain cleartext passwords
# Default file location: /etc/target/saveconfig.json
targetctl save [config-file]
# Restore
# Removes any existing configuration and replaces it with the configuration described in the file
targetctl restore [config-file]
# Remove
# Removes any existing configuration from the running kernel target
targetctl clear
# File
ls /sys/kernel/config/target/
core iscsi version
cat version
Target Engine Core ConfigFS Infrastructure v4.1.0 on Linux/x86_64 on 3.10.0-693.17.1.el7.x86_64
Server Enable / Disable target
Linux Side: Initiator
# Server disable target
Dec  7 13:31:41 seafile iscsid: connect to 192.168.123.41:3260 failed (Connection refused)
Dec  7 13:31:44 seafile iscsid: connect to 192.168.123.41:3260 failed (Connection refused)
Dec  7 13:31:47 seafile iscsid: connect to 192.168.123.41:3260 failed (Connection refused)
...

# Server enable target
Dec  7 13:31:50 seafile iscsid: connection1:0 is operational after recovery (28 attempts)
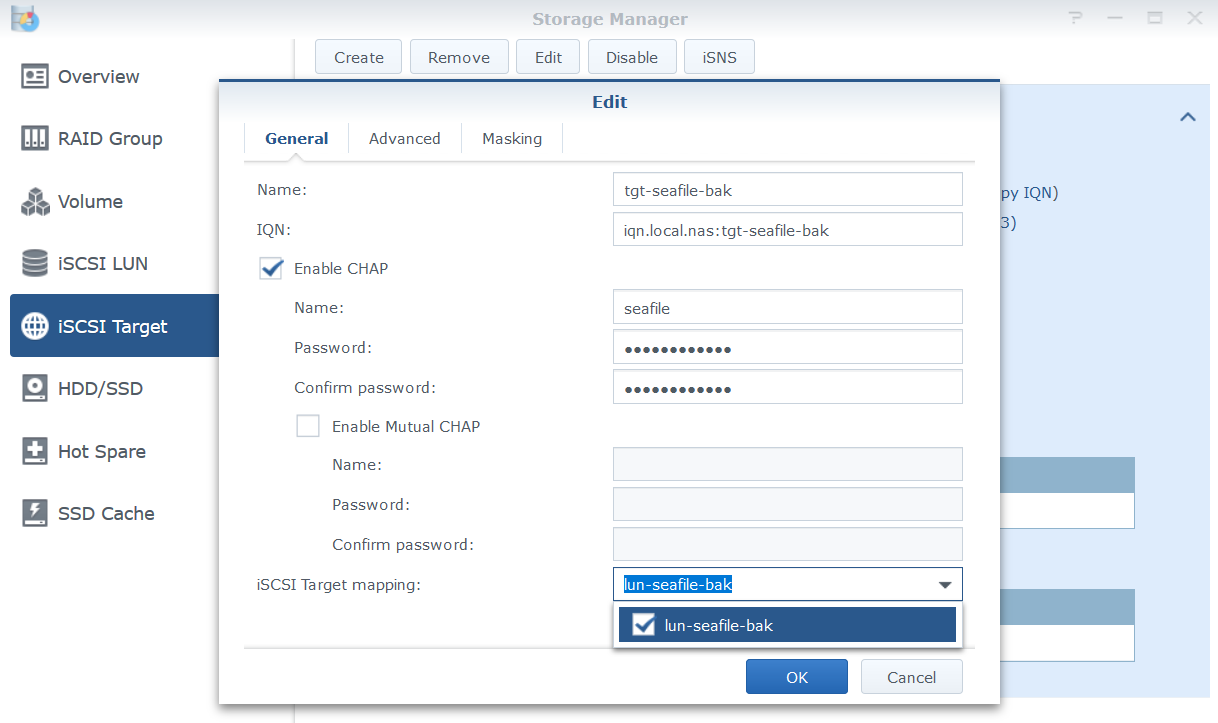
NAS - Synology
иЁӯе®ҡ Step
1. Lun <- # data
2. Target <- # Login
3. Target иЁӯе®ҡжңүд»Җйәј LUN
Initiator
There are two ways of establishing connection to the storage target using iscsiadm utility:
- sendtargets discovery (еӨҡж•ёз”Ёе‘ўеҖӢж–№жі•)
- static target login
# Install initiator
yum install -y iscsi-initiator-utils
# Check version
iscsiadm -V
iscsiadm version 6.2.0.874-2
# иЁӯе®ҡ Initiator зҡ„ IQN еҗҚзЁұ (еҝ…й Ҳ)
cat /etc/iscsi/initiatorname.iscsi
InitiatorName=iqn.local.seafile
# change to the same IQN you set on the iSCSI target server
# дҝ®ж”№еҫҢиҰҒ restart iscsid
# иЁӯе®ҡ Login иіҮж–ҷ (йҡЁж„Ҹ)
/etc/iscsi/iscsid.conf
# The default is None node.session.auth.authmethod = CHAP # Login иіҮж–ҷ node.session.auth.username = username node.session.auth.password = password
Remark: еңЁ Server иЁӯе®ҡ login
/iscsi/iqn.../tpg1
set auth userid=user
set auth password=password
# Start & Enable servcie
systemctl start iscsid
systemctl enable iscsid
ps aux | grep [i]scsi
root      3310  0.0  0.0  31516   340 ?        Ss   May30   0:24 /usr/sbin/iscsid
root      3311  0.0  1.3  42536 13920 ?        S<Ls May30   0:00 /usr/sbin/iscsid
root      3342  0.0  0.0      0     0 ?        S<   May30   0:00 [iscsi_eh]
# еёёз”Ё Opt зё®еҜ«
-m => --mode node | session | discovery | ...
-t => --type # type: sendtargets | fw | iSNS. This option is only valid for discovery mode.
-p => --portal IP
-T => --targetname iqn... # used along with --portal in node mode
# Discovery
iscsiadm -m discovery -t sendtargets -p 192.168.123.41
192.168.123.41:3260,1 iqn.local.nas:tgt-seafile-bak
# List discovery дәҶзҡ„ node records
iscsiadm -m node
iscsiadm: No records found
OR
192.168.123.41:3260,1 iqn.local.nas:tgt-seafile-bak
OR
iscsiadm -m node -p <ipaddress>
i.e.
iscsiadm -m node -p 192.168.123.41
# BEGIN RECORD 6.2.0.874-10
node.name = iqn.local.nas:tgt-seafile-bak
node.tpgt = 1
node.startup = automatic
node.leading_login = No
...
node.session.auth.authmethod = None
node.session.auth.username = <empty>
node.session.auth.password = <empty>
...
iscsiadm -m node -T iqn.local.nas:tgt-seafile-bak
# BEGIN RECORD 6.2.0.874-10
node.name = iqn.local.nas:tgt-seafile-bak
node.tpgt = 1
node.startup = automatic
node.leading_login = No
...
иӘӘжҳҺ
node.leading_login = No
For "automatic" startup nodes, (node.startup)
"Yes" will try logins on each available iface until one succeeds, and then stop.
"No" will try logins on all available ifaces simultaneously. (default)
# login to the target
# Login to All target
iscsiadm -m node --login
Logging in to [iface: default, target: iqn.2017-11.local.server1:t1, portal: 192.168.123.55,3260] (multiple)
Login to [iface: default, target: iqn.2017-11.local.server1:t1, portal: 192.168.123.55,3260] successful.
# Login portal е…§еҖӢеҲҘ target
iscsiadm -m node -T iqn.local.nas:tgt-seafile-bak --login
Logging in to [iface: default, target: iqn.local.nas:tgt-seafile-bak, portal: 192.168.123.41,3260] (multiple)
Login to [iface: default, target: iqn.local.nas:tgt-seafile-bak, portal: 192.168.123.41,3260] successful.
iscsiadm -m node -p 192.168.123.41 --login
# session
# -S, --show When displaying records, do not hide masked values, such as the CHAP secret
iscsiadm -m session
iscsiadm: No active sessions.
Or
tcp: [2] 192.168.123.41:3260,1 iqn.local.nas:tgt-seafile-bak (non-flash)
'[2]' жҳҜ session id дҫҶ
-r, --sid=sid
#жҹҘзңӢжҹҗ session зҡ„и©ізҙ°иіҮж–ҷ
iscsiadm -m session -r 2
# -s, --stats # Display session statistics.
iscsiadm -m session -r 2 -s
Stats for session [sid: 2, target: iqn.local.nas:tgt-seafile-bak, portal: 192.168.123.41,3260]
iSCSI SNMP:
        txdata_octets: 2352
        rxdata_octets: 2272
        noptx_pdus: 0
        scsicmd_pdus: 2
        tmfcmd_pdus: 0
        login_pdus: 0
        text_pdus: 0
        dataout_pdus: 0
        logout_pdus: 0
        snack_pdus: 0
        noprx_pdus: 0
        scsirsp_pdus: 2
        tmfrsp_pdus: 0
        textrsp_pdus: 0
        datain_pdus: 2
        logoutrsp_pdus: 0
        r2t_pdus: 0
        async_pdus: 0
        rjt_pdus: 0
        digest_err: 0
        timeout_err: 0
iSCSI Extended:
        tx_sendpage_failures: 0
        rx_discontiguous_hdr: 0
        eh_abort_cnt: 0
# Checking Block Device
# жҲҗеҠҹ Login еҫҢе°ұжңғжңүж–°зҡ„ Block Device
lsblk --scsi | grep iscsi
# NAME HCTL       TYPE VENDOR   MODEL             REV TRAN
sda  12:0:0:0   disk SYNOLOGY iSCSI Storage    4.0  iscsi
иЁӯе®ҡ Initiator е°Қжҹҗ target зҡ„ login
# CHAP еҝ…й ҲжңүеҜ«
iscsiadm --mode node -T iqn.local.nas:tgt-seafile-bak \
-o update -n node.session.auth.authmethod -v CHAP
# иЁӯе®ҡ Username & Password
iscsiadm --mode node -T iqn.local.nas:tgt-seafile-bak \
-o update -n node.session.auth.username -v myuser
iscsiadm --mode node -T iqn.local.nas:tgt-seafile-bak \
-o update -n node.session.auth.password -v mypass
# Login
iscsiadm -m node -T iqn.local.nas:tgt-seafile-bak --login
Initiator automatic login
# иЁӯе®ҡ: All the targets
/etc/iscsi/iscsid.conf
node.startup = manual|automatic
# иЁӯе®ҡ: All the ports on a target
iscsiadm --mode node -T targetname -o update -n node.startup -v manual|automatic
# иЁӯе®ҡ: A specific port on a target
iscsiadm --mode node -T targetname -p ip:port -o update -n node.startup -v manual|automatic
Initiator Logout
CLI
iscsiadm -m node -T targetname -p ipaddress -u
-u, --logout # only valid for node and session mode
i.e.
# з”Ё "iscsiadm -m session" жүҫеҮә當е…Ҳ session
iscsiadm -m node -p 192.168.123.41 -u
Logging out of session [sid: 5, target: iqn.local.nas:tgt-seafile-bak, portal: 192.168.123.41,3260]
Logout of [sid: 5, target: iqn.local.nas:tgt-seafile-bak, portal: 192.168.123.41,3260] successful.
# checking
lsblk --scsi | grep iscsi
# logout all target
iscsiadm -m node -u
Discovering new LUNs
當 Server / NAS зӮә target еҠ дәҶж–° LUN жҷӮ
iscsiadm -m session --rescan
Rescanning session [sid: 5, target: iqn.local.nas:tgt-seafile-bak, portal: 192.168.123.41,3260]
OR
iscsiadm -m session -r SID --rescan
lsblk --scsi | grep iscsi
sda 12:0:0:0 disk SYNOLOGY iSCSI Storage 4.0 iscsi
targets иҲҮ portals зҡ„зӣ®йҢ„
# This directory contains the nodes with their targets
# Centos 7
ls -R /var/lib/iscsi/nodes
/var/lib/iscsi/nodes: iqn.local.nas:seafile-bak-tgt /var/lib/iscsi/nodes/iqn.local.nas:seafile-bak-tgt: 192.168.123.41,3260,1 /var/lib/iscsi/nodes/iqn.local.nas:seafile-bak-tgt/192.168.123.41,3260,1: default # жӯӨ target зҡ„ setting
# This directory contains the portals
ls -R /var/lib/iscsi/send_targets
192.168.123.41,3260
/var/lib/iscsi/send_targets:
192.168.123.41,3260

/var/lib/iscsi/send_targets/192.168.123.41,3260:
iqn.local.nas:seafile-bak-tgt,192.168.123.41,3260,1,default
# link to /var/lib/iscsi/nodes/iqn.local.nas:seafile-bak-tgt/192.168.123.41,3260,1
Discover - Remove an iSCSI device discovery entry
iscsiadm -m node -o delete -p 192.168.123.55
ls -R /var/lib/iscsi/nodes
iscsiadm -m discoverydb -o delete -t sendtargets -p 192.168.123.55
ls -R /var/lib/iscsi/send_targets
Discover - Discovering new LUNs
# rescan
iscsiadm -m session --rescan
Rescanning session [sid: 11, target: iqn.2017-11.local.server1:t1, portal: 192.168.123.55,3260]
# жҹҘзңӢжүҫеҲ°д»Җйәј
lsblk --scsi | grep iscsi
Discover - discoverydb
SendTargets
A native iSCSI protocol which allows each iSCSI target to send a list of available targets to the initiator.
discoverydb record
A discoverydb record holds together the information required to discover the target including portal address
discovery mechanism
SendTargets in this case, credentials etc.
View the configuration in the discoverydb record
iscsiadm -m discoverydb
192.168.123.41:3260 via sendtargets
ls -1R /etc/iscsi/send_targets
/etc/iscsi/send_targets:
192.168.123.41,3260

/etc/iscsi/send_targets/192.168.123.41,3260:
iqn.test,192.168.123.41,3260,1,default
st_config
iscsiadm -m discoverydb -t st -p 192.168.123.41
(зӣёз•¶ж–ј "cat /etc/iscsi/send_targets/192.168.123.41,3260/st_config")
# BEGIN RECORD 2.0-873
discovery.startup = manual
discovery.type = sendtargets
discovery.sendtargets.address = 192.168.123.41
discovery.sendtargets.port = 3260
discovery.sendtargets.auth.authmethod = None
discovery.sendtargets.auth.username = <empty>
discovery.sendtargets.auth.password = <empty>
discovery.sendtargets.auth.username_in = <empty>
discovery.sendtargets.auth.password_in = <empty>
discovery.sendtargets.timeo.login_timeout = 15
discovery.sendtargets.use_discoveryd = No
discovery.sendtargets.discoveryd_poll_inval = 30
discovery.sendtargets.reopen_max = 5
discovery.sendtargets.timeo.auth_timeout = 45
discovery.sendtargets.timeo.active_timeout = 30
discovery.sendtargets.iscsi.MaxRecvDataSegmentLength = 32768
# END RECORD
discovery иҲҮ discoverydb mode зҡ„дёҚеҗҢ
discovery
* uses the iscsid.conf settings
* Performs a discovery operation
discoverydb
* Updates or queries the Open-iSCSI database records
(/etc/iscsi/send_targets/<IP>,<PORT>/)
* uses the discovery record settings if it exists
iSCSI Checksum
жңүе…©зЁ® checksum, еҲҶеҲҘжҳҜ
- header digest
- data digest
Default: CRC32C algorithm (32 bit) - A digest to detect errors that occur at this iSCSI layer.
affect performance => Disable the iSCSI digest
( relying upon TCP and Ethernet error detection mechanisms )
Bit errors in the header portion of the PDU are more problematic because there is no trail to expose the corrupted data
If the header error occurs during a write transaction,
the original data will be unchanged while a "random" block of data will be overwritten with the update value
PDU (Protocol Data Unit): The initiator and target divide their communications into messages.
The term "iSCSI protocol data unit" (iSCSI PDU) is used for these messages.
------------
# List the current parameters
iscsiadm -m node -T iqn.local.nas:tgt-seafile-bak
node.conn[0].iscsi.HeaderDigest = CRC32C
# Server е•ҹз”ЁдәҶ header еҸҠ data digest еҫҢ. еҰӮжһң Client жІ’жңүе•ҹеӢ•, йӮЈ Login жңғиҰӢеҲ°
iscsiadm -m node -T iqn.local.nas:tgt-seafile-bak --login
Logging in to [iface: default, target: iqn.local.nas:tgt-seafile-bak, portal: 192.168.123.41,3260] (multiple)
iscsiadm: Could not login to [iface: default, target: iqn.local.nas:tgt-seafile-bak, portal: 192.168.123.41,3260].
iscsiadm: initiator reported error (19 - encountered non-retryable iSCSI login failure)
iscsiadm: Could not log into all portals
# Enable HeaderDigest еҸҠ DataDigest
# Disable: -v None
iscsiadm --mode node -T iqn.local.nas:tgt-seafile-bak -o update -n node.conn[0].iscsi.HeaderDigest -v CRC32C
iscsiadm --mode node -T iqn.local.nas:tgt-seafile-bak -o update -n node.conn[0].iscsi.DataDigest -v CRC32C
# Centos7 - iscsiadm version 6.2.0.874-10 жңү bug
iscsiadm: Cannot modify node.conn[0].iscsi.DataDigest. Invalid param name.
# Verify
# -PN # info level: 0 - 3
# иҰҒ 2 жүҚиҰӢеҲ° HeaderDigest, DataDigest
iscsiadm -m session -P2 | grep Digest
HeaderDigest: CRC32C
DataDigest: None
Cheat List
iscsiadm -m discovery -t st -p 192.168.123.41
iscsiadm -m node -T iqn.test -o update -n 'node.session.auth.authmethod' -v CHAP
iscsiadm -m node -T iqn.test -o update -n 'node.session.auth.username' -v myusr
iscsiadm -m node -T iqn.test -o update -n 'node.session.auth.password' -v mypw
iscsiadm -m node -T iqn.test -o update -n 'node.conn[0].iscsi.HeaderDigest' -v CRC32C
iscsiadm -m node -T iqn.test -l
iscsiadm -m session
iscsiadm -m node -T iqn.test -u
жҲҗеҠҹ log
Logging in to [iface: default, target: iqn.test, portal: 192.168.123.41,3260] (multiple)
Login to [iface: default, target: iqn.test, portal: 192.168.123.41,3260] successful.
fstab Setting
Mount iscsi drive at boot case the system halts(CentOS 7)
add _netdev to mount
This way the mount point will be mounted only after the network start correctly.
iSCSI MultiSession(multipath) Setup
иҰҒз”ЁеҲ° Multipaht I/O (MPIO)
Step 0: Connect the LUN
iscsiadm -m session
Step 1: Install multipath package
# C 8
yum install device-mapper-multipath
- dm-multipath # kernel module
- multipath # Command used for viewing/listing multipath devices
- multipathd # daemon that moitors path
- kpartx # command used to create device mapper entries
Checking
modprobe dm_multipath
lsmod | grep dm_multipath
dm_multipath           40960  0
dm_mod                151552  1 dm_multipath
Step 3: иЁӯе®ҡ multipath
/etc/multipath.conf
defaults {
  checker_timeout 600
  # friendly names like /dev/mapper/mpath0
  user_friendly_names yes
}
blacklist {
  device {
    vendor "QEMU"
    product '*'
  }
}
systemctl enable multipathd
systemctl start multipathd
Checking
multipath -ll
multipathd -k
# ID_SERIAL
scsi_id -x -g -u -s /block/sdb
lsscsi
Step 4:
Update mounts and fstab from original /dev/sdX[0-9] path to "/dev/mapper/XXXXXXp[0-9]"
adding "nofail" to the /etc/fstab
Step 5: rebuild initramfs
# Debian/Ubuntu:
update-initramfs -u
# CentOS/RedHat
dracut -f
More info.
VMWare ESXi5.5 (and earlier versions) only supports 512 bytes Sector Size iSCSI LUN