жңҖеҫҢжӣҙж–°: 2018-11-23
д»Ӣзҙ№
ESX еҸҠ ESXi (ж–°зүҲ) йғҪжҳҜ VMware еҮәзҡ„ bare-metal hypervisor
е®ғеҖ‘зҡ„еҲҶеҲҘеңЁж–јESX еҢ…еҗ«дёҖеҖӢ Linux operating system (Service Console), иҖҢ ESXi еүҮз„Ў
жӯӨеӨ–, ESXi жңүз®ЎзҗҶе·Ҙе…·: vSphere
Ram зҡ„дҪҝз”Ё:
еңЁжІ’жңү VM зҡ„жғ…жіҒдёӢ, е®ғ(host)жңғз”Ё 500MB е·ҰеҸі
FileSystem:
ESXi 4 зҡ„ FS жҳҜ vmfs3 (Block Size: 1MB, Singe Image Max Size: 256GB)
Volume жңғ mount еӯҳж”ҫеңЁ /vmfs/volumes/UUID (Volume зҡ„еҗҚзЁұжңғ map еҺ» UUID, жүҖд»Ҙ Volume еҗҚеҸҜд»Ҙ "rename")
зӣ®йҢ„
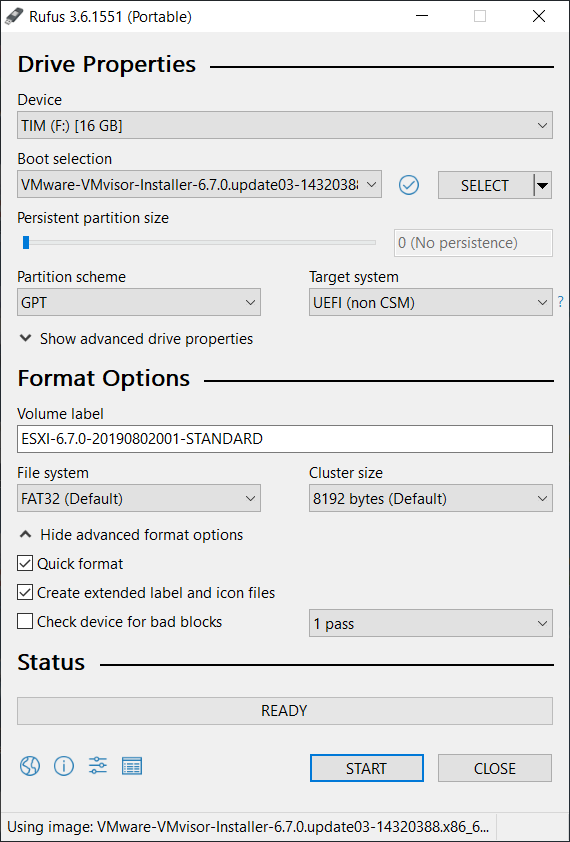
Create a Bootable ESXi Installer
Software: rufus
HomePage: https://rufus.ie/
Networking
* Default жңғжңүдёҖеҖӢ Network еҸ« VM_Network (еҸҜд»ҘеӨҡйҒҺдёҖеҖӢ)
* Management_Network(йғҪжҳҜ VM_Network зҡ„дёҖзЁ®дҫҶ) жҳҜеҗҢдёҖ NIC зҡ„
* vSwitch (ж”ҜжҸҙ Adapter зҡ„ failover, limit speed, load Balancing)
Connection Type:
* VM
* VMkernel жҳҜз”ЁдҫҶеҒҡ iSCSI, NFS
Diagram
Network --- vSwitch0 --- NIC
еңЁ Configuration -> Nwtworking -> Properties еҸҜд»Ҙжӣҙж”№е®ғеҖ‘
еҰӮжһңеҠ дәҶж–°зҡ„ NIC, йӮЈиҰҒеңЁ Properties -> Network Adapters еҠ дёҠжүҚеҸҜз”Ё
еҠ ISO Image
right click on your datastore and then select browse.
VMware vSphere Client иҰҒз”Ёзҡ„ port
tcp port:
- 443 <-- vSphere Client
- 902 <-- console
Esxi-4 free v.s. Esxi-5 free зҡ„еҲҶеҲҘ
ESXI-? = VMware vSphere Hypervisor
ESXi-4 free:
- Host CPU: 2
- Core Per CPU: 6
- RAM: 256GB
- VM-RAM: 256GB
- VM-CPU: 4 (еҸҲжңүдәәеҸ«е®ғеҒҡ vSMP(virtual symmetric multiprocessing))
6 cores per Processor:
- vSphere Essentials
- vSphere Essentials Plus
- vSphere Standard
- vSphere Enterprise
12 cores per Processor
- vSphere Advanced
- vSphere Enterprise Plus
ESXi-5.1 free:
- Host CPU: 1 (unlimited cores per CPU)
- RAM: 32GB <-- 20120810
- vRAM(per VM): ?G
- vCPU(per VM): 4 (Up to 8-way virtual SMP)
ESXi-5.5 free:
- no physical RAM limit
- vCPU: 4 (Up to 8-way virtual SMP)
- vRAM: 1011
Hareware:
- Asus P8H61-M LE(iCore3, Realtek 8168)
ж–°еҠҹиғҪ:
- management interface firewall
- Log messages can be remotely
- Standard
- Enterprise
- Enterprise Plus
- Essentials
- Essentials Plus
жҺҲж¬Ҡзҡ„дҪҝз”Ёйҷҗжңҹ:
йҒҺжңҹ: vm й—ңж©ҹеҫҢе°ұй–ӢдёҚиө·дҫҶ
VMware vSphere Client > Configuration > Edit
VMware vSphere ESXi е®үиЈқеҘҪеҫҢеҸҜи©Ұз”Ёе…©еҖӢжңҲ, е…Ҙ Key еҫҢжңғи®Ҡ Never
4 to 5 еҚҮзҙҡ:
VMware vSphere Client > Inventory > Virtual Machine > Upgrade Virtual Hardware ……
Enable SSH
VMware vSphere Client > Configuration > Software > Security Profile > Services >
Properties > SSH > Options > Startup Policy
File System: VMFS
Thick Provision Lazy Zeroed
Thick Provision Eager Zeroed
Thin Provision
VMFS: Thin / Thick
NFS: Thin
hostd иҲҮ vpxa
vpxa (VirtualCenter Agent) VirtualCenter Server to connect to a ESXi host
/var/log/vpxa.log
/etc/init.d/vpxa status
hostd (Host Agent) vSphere Client to connect to a ESXi host ( HTTP and HTTPS connections to the service console )
/var/log/hostd.log
/etc/init.d/hostd status
Upgrade
жҹҘзңӢзҸҫеңЁ Version:
vmware -lv
esxupdate --bundle update-from-esxi4.1-4.1_update01.zip update
Backup
Trilead VM ExplorerпјҡеӮҷд»ҪESX(i)иҷӣ擬主ж©ҹ
Free Version:
- Backup virtual machines while powered on
- Generate compressed backups
- Max Devices: 2
ssh
ESXi storage mount point:
- /vmfs/volumes/<UUID>
- /vmfs/volumes/<NAME>
Name -- soft link --> UUID
Configure File
*.vmx
memsize = "1024"

scsi0:0.present = "TRUE"
scsi0:0.fileName = "winsrv2k3.std.eng.oem.vmdk"
scsi0:0.deviceType = "scsi-hardDisk"
*-flat.vmdk <-- Data
*.vmdk
# Extent description
RW 58720256 VMFS "*-flat.vmdk"
иЁӯе®ҡ NTP
Step
- Connect to the ESX/ESXi host using the vSphere Client.
- Select a host in the inventory.
- Click the Configuration tab.
- Click Time Configuration.
- Click Properties.
жё¬и©Ұ
ntpq -p
     remote           refid      st t when poll reach   delay   offset  jitter
==============================================================================
*192.168.3.121         x.x.x.x    3 u  438 1024  377    0.442   -3.743  17.006
P.S.
еҰӮжһң time server ж—ўжҷӮй–“е…Ҳжң¬ж©ҹжҷӮй–“е·®еӨӘйҒ , е’Ғе°ұе””жңғ sync дәҶ.
ESXi 6.7
You cannot set timezone on esxi host.
You can either set the time manually or configure NTP server.
Check service tag
vSphere client -> "Configuration" tab -> "Hardware" section -> "Processors" link
inflate
If you created a virtual disk in the thin provision format, you can inflate it to its full size
Guest Tools
vmware-checkvm -h
VM's hw version is 4
VMware software version 6 (good)
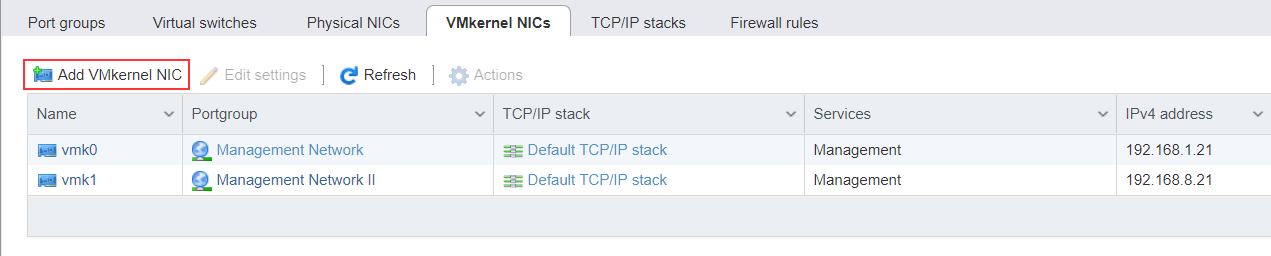
More than one management network
# V6.7
Default: vSwitch0 has a VMKernel Port called vmk0
[Step 1]
Networking -> Add standard virtual switch
[Step 2]
Networking -> VMkernel NICs -> Add VMkenel NIC
Network Secure
Forged transmits
Accept, ESXi does not compare source and effective MAC addresses.
The guest operating system does not detect that its virtual machine adapter cannot send packets by using the impersonated MAC address.
MAC Address Changes
Accept, ESXi accepts requests to change the effective MAC address to a different address than the initial MAC address.
The port that the virtual machine adapter used to send the request is disabled and the virtual machine adapter does not receive any more frames until the effective MAC address matches the initial MAC address.
The guest operating system does not detect that the MAC address change request was not honored.
Promiscuous Mode Operation
Promiscuous mode eliminates any reception filtering that the virtual machine adapter performs so that the guest operating system receives all traffic observed on the wire.
An administrator or root user within a virtual machine can potentially view traffic destined for other guest or host operating systems.
Common Information Model (CIM)
жҹҘзңӢ RAID зҡ„зӢҖж…Ӣ
HW: Fujitsu D2616-A22 GS1 (LSISAS2108 6Gb/s RAID-on-Chi)
- Bus interface: PCIe 2.0 x8
- Configuration on Disk (COD)
- Check Consistency for background data integrity - Make Data Consistent (MDC)
- Patrol read for media scanning and repairing
ж»ҝи¶іжўқ件
1. ESXiдё»ж©ҹжҲҗеҠҹй©…еӢ•LSI MegaRAID controller
2. дёҰе®үиЈқеҗҲйҒ©зҡ„LSI CIM/SMIS providers
Download SMIS providers
https://www.broadcom.com/support/download-search
жүҫ Driver
Product Group: Storage Adapters, Controllers ...
Product Family: RAID Controller Cards
Keyword: SMIS Provider
Install SMIS providers
Unpack the zip archive(VMW-ESX-5-x-0-lsiprovider-...zip)
Copy the file found in zip (vmware-esx-provider-lsiprovider.vib) to the host
ssh host
esxcli software vib install -v /vmfs/volumes/backup_disk/software/vmware-esx-provider-lsiprovider.vib
Reboot the ESXi host. (еҝ…й Ҳ)
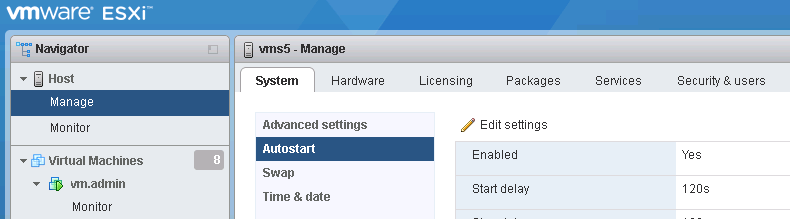
ESXi 7 auto start instance
For VMware ESXi hosts 6.5, 6.7, 7.0
Select Host -> Manage -> System -> Autostart -> Edit settings -> select Enable = Yes -> Click Save
Shutdown Action
for each VM available 4 shutdown actions:
- None,
- Power Off (Default)
- Suspend
- Guest Shutdown(Need install VMware Tools)
Instance Setting
1 - Log into the ESXi host web interface
2 - Select "Virtual Machines" from the Navigator
3 - Select the "Instance" you would like to configure for shutdown / startup
4 - Go to Actions - Autostart - click "Enable"
CLI
Enable Host autostart
vim-cmd hostsvc/autostartmanager/enable_autostart true
Checking auto start seq
vim-cmd hostsvc/autostartmanager/get_autostartseq
(vim.host.AutoStartManager.AutoPowerInfo) [
   (vim.host.AutoStartManager.AutoPowerInfo) {
      key = 'vim.VirtualMachine:6',
      startOrder = 1,
      startDelay = -1,
      waitForHeartbeat = "systemDefault",
      startAction = "powerOn",
      stopDelay = -1,
      stopAction = "systemDefault"
   },
   (vim.host.AutoStartManager.AutoPowerInfo) {
      key = 'vim.VirtualMachine:16',
      startOrder = 2,
      startDelay = -1,
      waitForHeartbeat = "systemDefault",
      startAction = "none",
      stopDelay = -1,
      stopAction = "systemDefault"
   }
]
當 startAction = "none" update е””еҲ°жҷӮ
Fix
vim-cmd vmsvc/unregister 16
vim-cmd solo/registervm /vmfs/volumes/RAID6/burp/burp.vmx
Enabling nested virtualization
* Enable nested virtualization support on a per VM basis
Step:
# ESXi 7.0
Select VM > Click "Edit" > VM Settings > expand CPU > Click "Expose hardware assisted virtualization to the guest OS"
vmkping
Version
7.0
The driver type is “vmklinux” or “native” as the support for “vmklinux” drivers was removed in ESXi 7
6.7u3