жңҖеҫҢжӣҙж–°: 2019-10-08
зӣ®йҢ„
- Software AC
- Check SN
- AP Login
- Reset AP
- Move AP to another site
- Adopt AP via DNS
- Adopt AP via ssh
- Adopt ap to new controller
- Guest Networks
- To Limit Guest Bandwidth
- Block LAN to WLAN Multicast and Broadcast Data
- P2P & P2P Cross Connect
- L2 Isolation
- TDLS Prohibit
- AC enable SSL
Software AC
Windows
# Install Service
cd "C:\Users\Administrator\Ubiquiti UniFi\lib"
Change directory using the command “cd <unifi_base>”
Type "java -jar ace.jar installsvc"
# Uninstall Service
Type: "java -jar ace.jar uninstallsvc"
If you are using Windows x64 please install both
the x86 AND the x64 version of Java otherwise the service will not properly start.
net start UniFi
Linux
System Requirements
* mongoDB 1.6.5 (http://www.mongodb.org/downloads)
* Sun Java 6
# mongod
make sure /path/to/UniFi/bin/mongod points to the /path/to/mongod
# to run it
cd /path/to/UniFi/
java -jar lib/ace.jar start
i.e.
java -jar /usr/share/UniFi/lib/ace.jar start &
# to stop it
cd /path/to/UniFi/
java -jar lib/ace.jar stop
java -jar lib/ace.jar info
unifi.version=4.8.14 (atag_4.8.14_7436 - release)
unifi.https.port=8443
unifi.ip=10.10.0.82
os.name=Linux
os.version=2.6.32-573.8.1.el6.i686
java.version=1.6.0_45
java.home=/usr/share/jre1.6.0_45
Settings
/var/lib/unifi/system.properties
unifi.xms=2048
unifi.xmx=2048
systemctl enable unifi.service --now
Check AP SN
SN зӣёз•¶ж–јжІ’жңү ":" зҡ„ MAC Address
ssh AP
[ж–№ејҸ 1]
grep serialno /proc/ubnthal/system.info
[ж–№ејҸ 2]
info
Model:       UAP-AC-Pro-Gen2
Version:     3.4.16.3435
MAC Address: 04:18:d6:x:x:x
IP Address:  192.168.0.113
Hostname:    UBNT
Uptime:      963 seconds

Status:      Unable to resolve (http://unifi:8080/inform)
AP login
Controller Version: 6.0
New/After reset
hold down the reset button for more then 5sec
ssh default login: ubnt / ubnt
Join AP еҫҢ, ssh зҡ„ login жңғи·ҹ AC е…§зҡ„иЁӯе®ҡ
YOUR SITE > Settings Panel > Site Tab > Tick Enable advanced features
д№ӢеҫҢ refresh жңғжңү DEVICE AUTHENTICATION Section
* Default жңғз”ҹжҲҗ random pw for user "admin"
Reset AP
Step
1) ssh x.x.x.x
2) set-default # restore to factory default
Move AP to another site
Navigate to and select the device that is being moved to a new site.
Config > Manage Device > Forget This Device > [Move this device to ...] / default site
Forget this device
If you no longer wish to manage a device, you may remove it.
Note that all configuration and history with respect to the device will be wiped out.
Adopt AP via DNS
еҒҮиЁӯеҺҹжң¬жҳҜз”Ёд»ҘдёӢ URL Adopt
еңЁ router дёҠе°Ү domain "unifi" жҢҮеҗ‘ AC зҡ„ FQDN / IP
當 AP power-on еҫҢ, 經 DHCP зҚІеҫ— DNS еҫҢ, е®ғжңғеҺ»жүҫ "unifi" дёҰеёёи©Ұ adopt иҮӘе·ұ.
Adopt AP via ssh
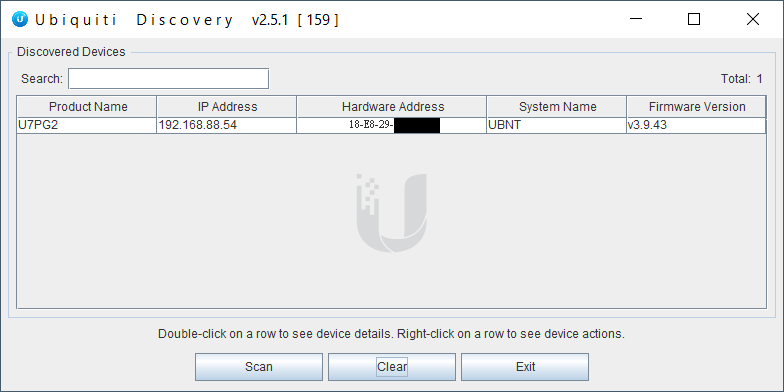
[A] Discovery Utility (java) [еҰӮжһңзҹҘ AP IP, йӮЈжӯӨжӯҘй©ҹеҸҜд»ҘзңҒз•Ҙ]
It listens to the multicast/broadcast packets from UniFi APs
Action commands: Set Inform/Locate/Reboot/Restore to Default
https://www.ui.com/download/utilities/ # ubnt-discovery.zip

[B] Chrome plugin - Ubiquiti Device Discovery Tool
https://chrome.google.com/webstore/detail/ubiquiti-discovery-tool/hmpigflbjeapnknladcfphgkemopofig?hl=en
[C] SSH - L3 adoption via CLI command
0) ssh AP with Default login: ubnt/ubnt # еҰӮжһңжӯӨ login дёҚжҲҗеҠҹ, йӮЈ hard-reset е®ғ
1) Make sure the device is in the factory default state.
sudo syswrapper.sh restore-default # еҹ·иЎҢ cmd еҫҢ, е®ғжңғ auto reboot
2) ssh AP and inform
set-inform http://ip-of-controller:8080/inform # URL ж”ҜжҸҙз”Ё domain name
3) On AC
the UniFi device will show up for adoption in the Default site 's Devices section of the controller.
Once you click Adopt, the device will appear to go offline or have the status of "Adopting".

Controller: click "Adopt" -> Adopting -> auto reboot -> PROVISIONING -> auto reboot -> CONNECTED
Remark
UniFi APs have a default inform URL http://unifi:8080/inform.
Thus, the purpose of using DHCP option 43 or DNS is to allow the AP to know the IP of the Controller.
DHCP option 43 can be done by just entering the IP address of the UniFi Network Controller in the "unifi" field on the DHCP-server.
Mikrotik CLI
# 01: suboption
# 04: length of the payload (must be 4)
# C0A8030A: 192.168.3.10
/ip dhcp-server option add code=43 name=unifi value=0x0104C0A8030A
/ip dhcp-server network set 0 dhcp-option=unifi
Adopt ap to new controller
ssh AP_IP # ssh еҲ° AP
set-default # Reset AP
set-inform http://ac.local:8080/informВ В В # New AP Controller
AP reboot еҫҢжҹҘзңӢ, ssh еҲ° AP жҹҘзңӢжҳҜеҗҰдҪҝз”Ёж–° Controller
info
set-inform http://ac.local:8080/inform
* AP Controller иҪү hostname йғҪдҝӮе’ҒеҒҡ
e.g.
set-inform http://192.168.0.82:8080/inform # иҪүжҲҗ set-inform http://ac.local:8080/inform
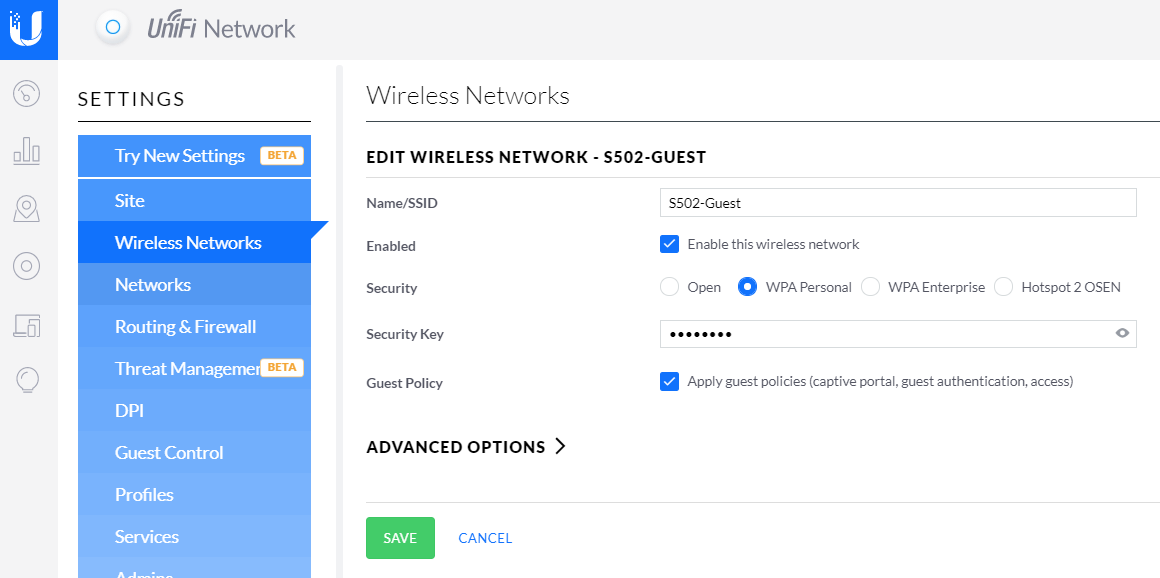
Guest Networks
Guest Networks exist independently from the Guest Portal and/or Hotspot System,
which are built-in tools for guest authentication, authorization & accounting.
By default, guest policies will
- wireless client isolation
- Pre & post-authorization access restriction to RFC 1918 Private LAN IP ranges as configured,
under the Guest Control Settings tab.
- drop broadcast traffic
Enable guest policies

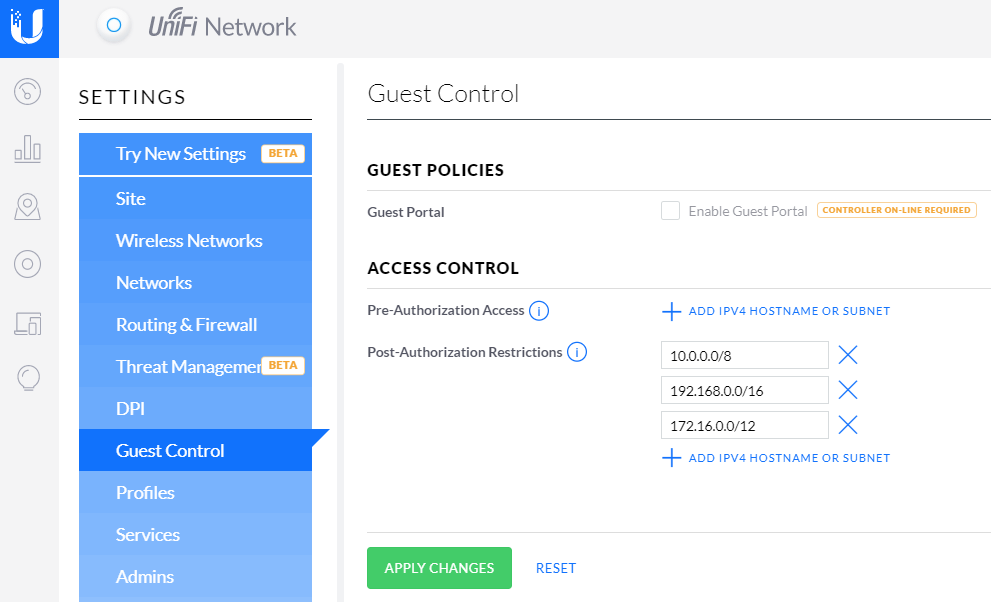
Settings > Guest Control
Post-Authorization Restrictions
* prevent guests from accessing specific hostnames or subnets.
# Default
10.0.0.0/8
192.168.0.0/16
172.16.0.0/12
Pre-Authorization Access
It can be useful is ensuring that devices can access the guest portal(192.168.0.2) before being Authorized
i.e.
Pre: 192.168.0.2/32
Post: 192.168.0.0/16
Remark
* DHCP and DNS packets are allowed anyway.

Notes
еңЁ V8 е®ғж•ҙеҗҲеҲ° hotspot дәҶ. дҫҝз”Ё WAP2 иӘҚиӯүзҡ„и©ұ, еҸҜд»ҘеңЁ hotspot еҒңз”Ё landing page
To Limit Guest Bandwidth
1. Go to Settings > User Groups.
2. Click on Create a New User Group.
3. Define the desired bandwidth limit.
4. Go to Settings > Wireless Networks.
5. Click on the corresponding Guest Network and expand Advanced Options.
6. Click the drop-down box next to User Group and select the guest user group.
7. Click Save to apply the changes.
* devices need to reconnect to take effect
Block LAN to WLAN Multicast and Broadcast Data
Option under the SSID settings.
This will prevent ingress (from LAN) multicast and broadcast data from being transmitted out of the SSID (WLAN).
* The frames are dropped at a wireless driver level.
Therefore, if you run a tcpdump on the athX interface of the AP itself,
traffic that will wind up being blocked later will appear.
=> verifying the blockage via tcpdump won't work
tcpdump -i athX
Wireless Network Settings does not actually block stations from sending broadcast frames to the AP for forwarding onto the wired network.
Instead, it blocks broadcast frames that are destined to the athX interface and avoids them from being transmitted.
P2P & P2P Cross Connect
P2P = WiFi Direct
directly to each other via Wi-Fi without an intermediate access point.
The device implementing AP-like functionality in P2P group is referred to as the P2P Group Owner(P2P GO),
and device acting as client are known as P2P clients.
A P2P GO announces itself through beacons
When the device act as both as P2P client and as P2P GO
the device will typically alternate between the two roles by time-sharing the Wi-Fi interface
Wi-Fi direct does not allow transferring the role of P2P GO within the group.
(If P2P GO leaves the P2P group then the group is break down, and has to re-established.)
Cross-Connect
the devices in its P2P group to an external network
Only the P2P GO is allowed to cross-connect the devices in its P2P group to an external network.
SECURITY
Wi-Fi Direct devices are required to implement Wi-Fi Protected Setup (WPS)
to support a secure connection with minimal user intervention.
WPS allows establishing a secure connection by introducing a PIN in the P2P Client,
or pushing a button in the two P2P Devices.
L2 Isolation
Isolates stations on layer 2 (ethernet) level (By ebtables)
This setting isolates wireless clients from communicating with each other on the same UAP.
Varies slightly from guest policies, which only isolated clients on the same radio.
TDLS Prohibit
Block Tunneled Link Direct Setup (TDLS) connections
TDLS
This allows devices to stream/talk to each other and not use the AP
жөҒзЁӢ
з”ұдёҖеҸ°иЈқзҪ®йҖҡйҒҺ AP / GO еҗ‘еҸҰеӨ–дёҖеҸ°иЈқзҪ®еӮійҖҒ TDLS Discovery и«ӢжұӮ
(TDLS Discovery дәӨжҸӣжҮүз”ЁдёҰйқһеҝ…иҰҒйҒёй …, TDLS иЈқзҪ®еҸҜд»ҘйҒёж“ҮзӣҙжҺҘеҳ—и©ҰйҖІиЎҢ TDLS иЁӯе®ҡ)
....
TDLS жҖ§иғҪеҸҜд»Ҙз”ұзі»зөұз®ЎзҗҶе“Ўй—ңй–ү.
(еңЁ AP Beacon дёӯиЁӯе®ҡ"зҰҒжӯўTDLS"дҫҶеҒңз”ЁTDLS)
AC enable SSL
[1]
service unifi stop
[2]
# backup original keystore
mv /var/lib/unifi/keystore /var/lib/unifi/keystore.`date "+%Y%m%d-%H%m%S"`
[3] Save Cert & Key to server
touch /tmp/Unifi.key /tmp/fullchain.crt
touch /tmp/Unifi.key
chmod 600 /tmp/Unifi.key
vi /tmp/fullchain.crt
vi /tmp/Unifi.key
[4] Create JKS keystore
* The JKS keystore uses a proprietary format.
i) convert chain to appropriate format(p12)
openssl pkcs12 -export -inkey /tmp/Unifi.key -in /tmp/fullchain.crt \
-out /tmp/cert.p12 -name unifi -password pass:temppass
ii) import chain to /var/lib/unifi/keystore
keytool -importkeystore -deststorepass aircontrolenterprise -destkeypass aircontrolenterprise \
-destkeystore /var/lib/unifi/keystore \
-srckeystore /tmp/cert.p12 -srcstoretype PKCS12 -srcstorepass temppass -alias unifi -noprompt
[5] cleanup
rm -f /tmp/root.crt /tmp/Unifi.key /tmp/fullchain.crt /tmp/cert.p12
[6]
service unifi start
![йҰ–й Ғ Logo ¶гБВ Keith і]ӯp !!](/themes/mytheme/logo.png)