жңҖеҫҢжӣҙж–°: 2023-08-20
д»Ӣзҙ№
Veeam Backup & Repilication 9.5 Free
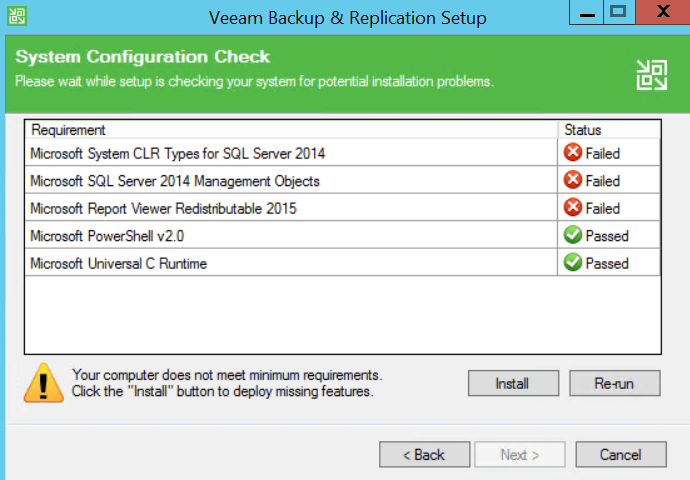
иҰҒе®үиЈқ:
- .Netframework 4.5
- SQL 2014
- PowerShell v2
ISO file size: 2G
иҲҮ收費зүҲзҡ„еҲҶеҲҘ:
- First 10 instances free
-
>11 instances еҸҜд»ҘдҪҝз”Ё VeeamZIP
(дёҚж”ҜжҸҙ incremental backups)
Veeam Agent
йҷҗеҲ¶
- Daily schedule (жІ’жңү weekly, monthly)
- дёҚж”ҜжҸҙ Application-aware processing (databases)
- дёҚж”ҜжҸҙ File indexing and search (search of individual files)
- дёҚж”ҜжҸҙ Object Storage (S3)
- дёҚж”ҜжҸҙ Synthetic full (incremental backups еҗҲжҲҗдёҖеҖӢ full backup)
зӣ®йҢ„
- Free Version
- ...
- Instant Recovery vs Restore entire VM
- extract.exe
- Remore Import Disk
Free Version
Free version жІ’жңүд»ҘдёӢеҠҹиғҪ:
- Full backups of individual VMs only (no scheduled, incremental or multi-VM backups)
- No vPower capabilities
- No VM replication
- No scripting
vPower
- Recovery verification
- Instant VM Recovery
- Universal Application-Item Recovery (U-AIR)
- On-Demand Sandbox
- Muti-OS file-level restore
The key construct of the vPower technology is the vPower NFS Service.
The vPower NFS Service is a Microsoft Windows service that runs on a Microsoft Windows machine and enables this machine to act as an NFS server.
When you start a VM from the backup, Veeam Backup & Replication "publishes" VMDK files of the VM from the backup on the vPower NFS datastore.
Technically, Veeam Backup & Replication emulates the presence of VMDK files on the vPower NFS datastore —
the VMDK files themselves are still located in the backup file on the backup repository.
Firewall
Backup service(Console): 9392
Catalog service: 9393
Secure connections: 9401
Connect to VMware vSphere (дёҚж”ҜжҸҙ vSphere free version)
Port: 443
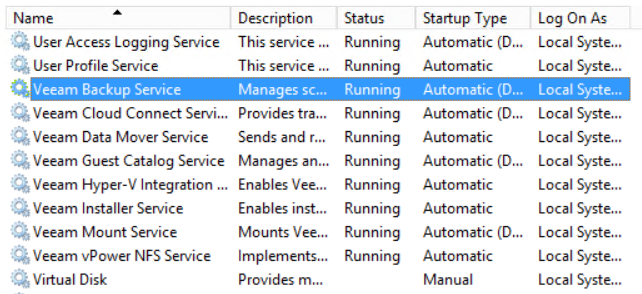
Services
# Start ж¬ЎеәҸ
SQL Server (VEEAMSQL2016) # дёҖе®ҡиҰҒ Start е®ғе…Ҳ
VeeamBackupSvc # 9392/TCP <-- GUI (Console)
VeeamCloudSvc
VeeamTransportSvc
VeeamBrokerSvc # 9501/TCP
Restore full backup file (.vbk) on another machine
ж–№жі•жңүе…©еҖӢ
1. import your backup files into this other Veeam B&R installation
2. standalone utility (extract.exe)
* Extract only reads VBK files, not vib or vrb (incremental)
extract.exe — utility working via the command-line interface
extract.exe жүҖеңЁзҡ„ Path:
%PROGRAMFILES%\Veeam\Backup and Replication\Backup
extract.exe зҡ„ GUI
Veeam.Backup.Extractor.exe
дҪҝз”Ё:
copy the Veeam.Backup.Extractor.exe file together with the extract.exe file from the product installation folder and
store these files to the same folder on the destination machine.
Active Full
Produces a full backup of a VM
The active full backup resets a backup chain.
All incremental backup files use the latest active full backup file as a new starting point.
A previously used full backup file remains on disk until it is automatically deleted according to the retention policy.
You can create active full backups manually or schedule a backup job to create active full backups periodically.
е»әз«Ӣ active full backup
Right Click -> Active Full
Synthetic full backups
VeeamAgentWindows
Veeam Agents for Microsoft Windows and Linux are purchased as part of Veeam Backup & Replication and related suites.
Veeam Agents are licensed with a portable Veeam Universal License (VUL).
COMMUNITY EDITION
- Up to 10 workloads for Free
SUPPORTED OS
- Windows 7 SP1, 8, 8.1, 10
- Windows Server 2008 R2 SP1, 2012, 2012 R2, 2016 and 2019
Version
-
V3.0.2.1170
For the Free product edition, you can configure one backup job only.
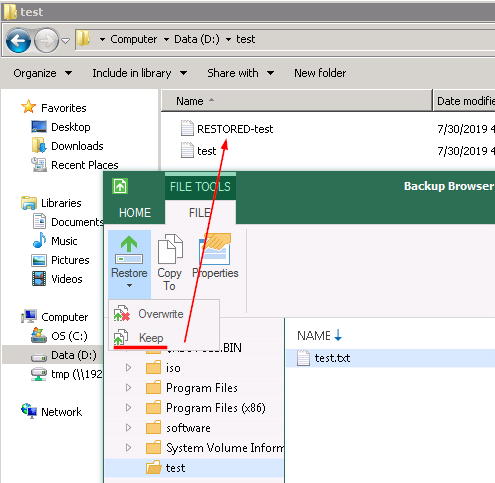
Restore with "Keep"
Deleting Backups
Backup files created with Veeam Agent for Microsoft Windows are removed automatically according to the retention policy settings.
If necessary, you can remove a backup file manually with a file manager, for example, Microsoft Windows Explorer.
Always delete the whole backup chain from the target location.
If you delete a full backup file or individual incremental backup file from the backup chain,
the chain will be broken, and Veeam Agent for Microsoft Windows will fail to perform the scheduled backup next time.
If you remove the whole backup chain from the target location, during the next backup job session,
Veeam Agent for Microsoft Windows will produce a new full backup. All subsequent backups will be incremental.
License
physical servers and cloud instances
protect their heterogeneous environments from a single management console
The new Veeam Universal License (VUL) is a portable license that allows you to protect Cloud, Virtual or Physical workloads interchangeably.
Workloads that have been processed in the past 31 days are considered protected.
Every protected workload consumes instances from the license scope.
Upgrading License
After you upgrade Veeam Agent for Microsoft Windows to version 4.0,
you must obtain and install a new per-instance license. (90-day grace period after the product is upgraded.)
To work with a commercial version of Veeam Agent for Microsoft Windows,
you must obtain a license and install it on the protected computer.
If you do not install a license, you will be able to use the Free edition of the product only.
Updating License
Veeam Backup & Replication connects to the Veeam License Update Server,
downloads a new license from it (if the license is available)
Statistics on the manual license update process is available under the System node in the History view.
You can double-click the License key auto-update job to examine session details for the license update operation.
Upgrading Veeam
v9.5 to v10
To perform upgrade of Veeam Backup & Replication to version 10,
you must be running version 9.5 Update 3 or later on the supported operating system
v9.0 to v9.5
Please confirm that you are running version 9.0 Update 2 (build 9.0.0.1715) or later prior to installing this update.
1. The first step is to realize a configuration backup of Veeam server
гҖҢConfiguration BackupгҖҚ menu
2. stop properly the 6 Veeam services before upgrading (services.msc)
3. run the installation file "Setup.exe", Click "Upgrade"
Use the version 9.5 license file
Reboot
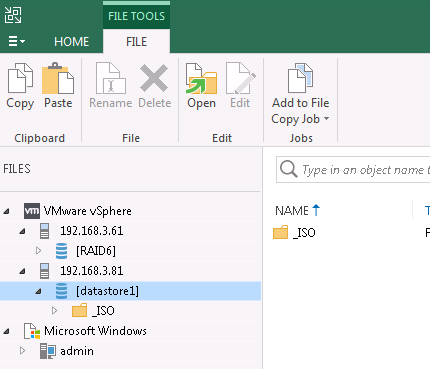
Veeam fastscp
е®ғж”ҜжҸҙ ESXi й–“зӣҙжҺҘ copy ( 3.61 жҠ„еҺ» 3.81 )
Integrated with Veeam Backup & Replication™ Community Edition. (V10)
Instant Recovery vs Restore entire VM
Instant Recovery
зү№й»һ: mount a recovered VM image to an ESXi host directly from a compressed and deduplicated backup file.
еҘҪиҷ•: no need to extract the VM from the backup file and copy it to production storage
=> perform restore in a matter of minutes
=> minimize disruption and downtime of production workloads.
гҖҖ* limited I/O performance.
To provide full I/O performance, you must migrate these "temporary spares" to the production site.
(Finalizing the process)
е°Қ Image зҡ„еҪұйҹҝ
The VM remains in read-only state to avoid unexpected modifications.
By default, all changes to virtual disks that take place while a restored VM is running are logged to auxiliary redo log files
residing on the NFS server (backup server or backup repository).
These changes are discarded as soon as the restored VM is removed, or
merged with the original VM data when recovery is finalized.
е°Қ ESXi зҡ„еҪұйҹҝ
- иў« Retore зҡ„ VM жңғеӨҡдәҶеҖӢ snapshot - Snap: "VEEAM IO REDIRECTION SNAPSHOT"
- ESXi жңғд»Ҙ NFS mount Veeam - Vol: "VeeamBackup_WIN-HOSTNAME"
Finalizing the process
The Instant Recovery process is a temporary state that requires to be finalized.
The available options are:
-
VMware Storage vMotion
to migrate the restored VMs to the desired datastore without any downtime -
Veeam Quick Migration feature
(If your VMware vSphere license does not provide support for vMotion and Storage vMotion) -
Stop Sesssion
the restored VM will be unpublished without any change to the original restore point
Finalizing the process: Veeam Quick Migration
- Migrate to production # е®ҢжҲҗ Migrate
- Stop publishing # еҸ–ж¶Ҳ Migrate
Migrate to production
# еңЁ Home е…§еӨҡдәҶеҖӢ "Instant Recovery" Tab
Home -> Instant Recovery -> Migrate to production
иЁӯе®ҡ:
1. Destination
2. Transfer (Source proxy, Target proxy)
3. Ready: йҒё "Delete source VM files upon successful quick migration"
* If you do not enable this option, the Instant Recovery session will still be running,
and you will need to unpublish the recovered VM manually.
(Home > Instant Recovery > Stop publishing)
Step
1. A temporary VM is created on the target datastore.(ORIG_VM_NAME_UUID)
2. Veeam copies the disk from the original datastore to the temporary VM on the target datastore.
3. If the original VM is powered on, Veeam Backup & Replication suspends it.
If changes were made to the original disk during the copy process performed at step 3,
Veeam copies these changes to the disk of the temporary VM.
4. On the original VM, Veeam replaces old path to the disk with the path to the disk of the temporary VM.
If the original VM was suspended during the migration, Veeam powers the VM on.
Veeam Agent for Microsoft Windows
Agent can operate in either standalone or managed mode(Veeam Backup & Replication)
How Backup Works
1.
On Microsoft Windows Client OSes, Veeam Agent creates a copy-only VSS snapshot.
On Microsoft Windows Server OSes, Veeam Agent creates a full VSS snapshot.
* By default, Microsoft Windows does not include offline Outlook Data Files (.ost) into a VSS snapshot.
2.
For volume-level backup, Veeam Agent copies data blocks of the whole volume.
During incremental backup, Veeam Agent uses CBT to retrieve only those data blocks that have changed since the previous backup session.
CBT(Changed Block Tracking)
CBT еҲҶеҲҘ
- Default CBT mechanism
- Veeam CBT driver
Default CBT mechanism
During the full backup job session, Agent uses MFT records to create digests with file system metadata.
subsequent incremental job
Agent reads the Master File Table (MFT) of the backed-up volume and creates the new digests with file system metadata.
Compares new and previous digests to detect files whose data blocks have changed on the volume since the previous job session.
Agent reads from the VSS snapshot only data blocks pertaining to files that have changed since the previous job session.
Veeam CBT driver
* Prior to installing the Veeam CBT driver on a computer running Microsoft Windows Server 2008 R2 SP1,
make sure that update KB3033929 is installed in the OS.
The update adds the SHA-2 code signing support that is required for verification of the Veeam CBT driver signature.
Without this update installed, the OS running on a protected computer will fail to boot after you install the Veeam CBT driver.
To learn more, see this Microsoft KB article.
Veeam Agent needs to reboot the computer.
After computer reboot, the Veeam CBT driver will start keeping track of changed data blocks on computer volumes whose data you have selected for backup in the Veeam Agent backup job settings.
Information about changed data blocks is registered in special VCT files.
VCT files are stored in the C:\ProgramData\Veeam\EndpointData\CtStore folder on the Veeam Agent computer.
The Veeam CBT driver cannot detect data block changes made on a volume that is mounted in a non-Windows OS.
To continue the backup chain after such changes, you need to create active full backup instead of incremental backup. Alternatively, you can reset CBT.
To reset CBT
"C:\Program Files\Veeam\Endpoint Backup\Veeam.EndPoint.Manager.exe" RESETCBT all
To install the Veeam CBT driver:
Double-click the Veeam Agen > main menu > Settings > Click "Install CBT driver"
reboot
Verify
Double-click the Veeam Agen > main menu > Settings > "Install CBT driver" жңғи®ҠжҲҗ Uninstall
extract.exe
# %PROGRAMFILES%\Veeam\Backup and Replication\Backup
Window
- Veeam.Backup.Extractor.exe - utility working in GUI (can be used on Microsoft Windows machines only)
- extract.exe - utility working in the command-line interface, a version for Microsoft Windows
Linux
- extract - utility working in the command-line interface, a version for Linux
Usage
# Getting Encryption Status of Backup File
extract.exe –getEncryptionStatus pathtobackup
Not encrypted
# Extract
extract.exe [-password backupkey] [pathtobackup]
i.e.
extract.exe -password "mypw" "D:/Backup/server.vbk"
extract.exe -restore path_to_vbk "D:/restore"
Remove Import Disk (imported)
еңЁ UI жё…дәҶе®ғ
CTRL + right click --> Remove from configuration
Delete from disk
# е°Ҹеҝғ, жӯӨжңғеҲӘйҷӨ config & files !!