жңҖеҫҢжӣҙж–°: 2019-03-11
зӣ®йҢ„
- зҒ«зүӣ
- Login as admin & sudo
- Build-in User
- Power-off by power button
- Power-off by power button
- Apps 's Network Port(TCP)
- еёёз”Ё Setting
- Set IP By CLI
- Restart Service By CLI
-
Synology иҮӘ家зҡ„ RAID Format
------------ APP ------------ - App Version
- PhotoStation
- Hyper Backup
- Time Machine Backup (иҲҠ)
- Cloud Station Server
- Cloud Station Backup
- CloudSync
- Synology Cloud Station Drive
- Storage Analyzer
-
Synology VMM(Virtual Machine Manager)
------------------------------ - btrfs
- iSCSI
- User Home Service
- Shared Folder Sync
- rsync
- Synology NAS Migration
- dss file
- Resource Monitor - Usage History
- "@eaDir" Folder
- Update Local SSL Certificate By Script
- Log Center
- Replace HDD
- Ugrage RAID Level
- Scheduling a Task
- Disk Space Warning
- Docker
- 512n & 4K native drive
- е®үе…ЁиЁӯе®ҡ: иҮӘеӢ•е°ҒйҺ– & дҝЎд»»з”ЁжҲ¶з«Ҝ
- Troubleshoot
- Models
зҒ«зүӣ
918+ # 4-pin, 12V, 8.33A # 918+
[-----] | . | <-- йҮ‘еұ¬й ӮйҮқ |+ +| <-- жӯЈжҘө \ - - / \___/
Login as admin & sudo
sudo is only available from 6.0 and up.
login as root with the admin password same as DSM version < 6.0
Build-in User
"Authenticated Users" & "SYSTEM" Group
The options of Authenticated Users and SYSTEM in the User or group drop-down menu are created in order to match the privilege settings of Windows ACL.
Their privilege scopes are as follows:
- users: This is the default group for all users.
- Authenticated Users includes accounts excluded from https and guest.
- SYSTEM includes accounts in https and anonymous.
Power-off by power button
press the power button and hold it (about 3-5 seconds)
you hear a beep sound and the Power LED starts blinking.
Apps 's Port
жҺ§еҲ¶жҹҗ Service Listen д»Җйәј Port
DSM
Control Panel > Network > DSM Settings > DSM ports (HTTP, HTTPS)
Default: 5000 (HTTP), 5001 (HTTPS)
DS file, File Station
Control Panel > Application Portal > File Station
Default: 5000 (HTTP), 5001 (HTTPS)
Hyper Backup (зӣ®зҡ„ең°з«Ҝ)
Default: 6281 (еӨҡзүҲжң¬еӮҷд»Ҫ), 22 (еҰӮжһңйҖҡйҒҺ SSH еҠ еҜҶ), 873 (йҒ з«ҜиіҮж–ҷиӨҮиЈҪ)
Cloud Station, DS cloud
Default: 6690
iSCSI
Default: 3260
CIFS
Default: smbd: 139/TCP (netbios-ssn), 445/TCP (microsoft-ds)
еёёз”Ё Setting
* To enable password strength rules # Control Panel > User > Advanced
Set IP By CLI
/etc/sysconfig/network-scripts/ifcfg-eth0
DEVICE=eth0
BOOTPROTO=static
ONBOOT=yes
IPV6INIT=no
IPADDR=192.168.123.41
NETMASK=255.255.255.0
/etc/sysconfig/network
NETWORKING=yes
HOSTNAME=DiskStation
GATEWAY=192.168.123.1
/etc/rc.network restart
Restart Service By CLI
synoservicectl --restart sshd
--start
--stop
--restart
--reload
--status
synoservicectl --status ftpd
ftpd start/running
Enable ssh tcp forwarding
/etc/ssh/sshd_config
AllowTcpForwarding yes
# Reload sshd
synoservicectl --reload sshd # DSM 6
sshd reloaded.
Or
kill -HUP `cat /var/run/sshd.pid`
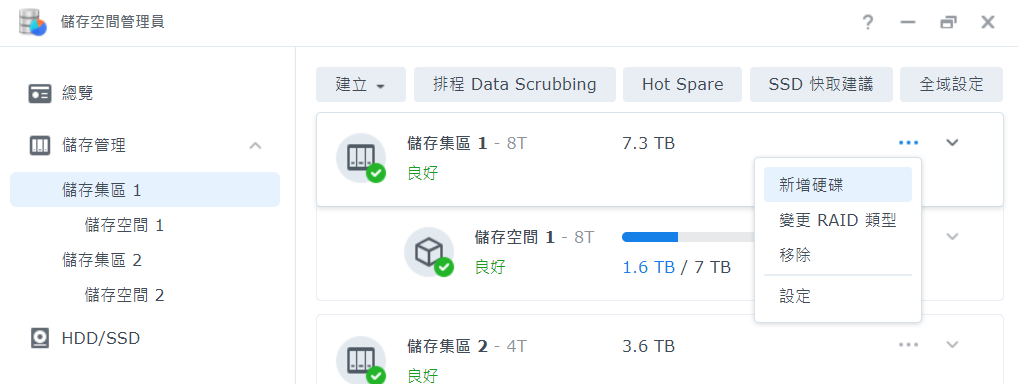
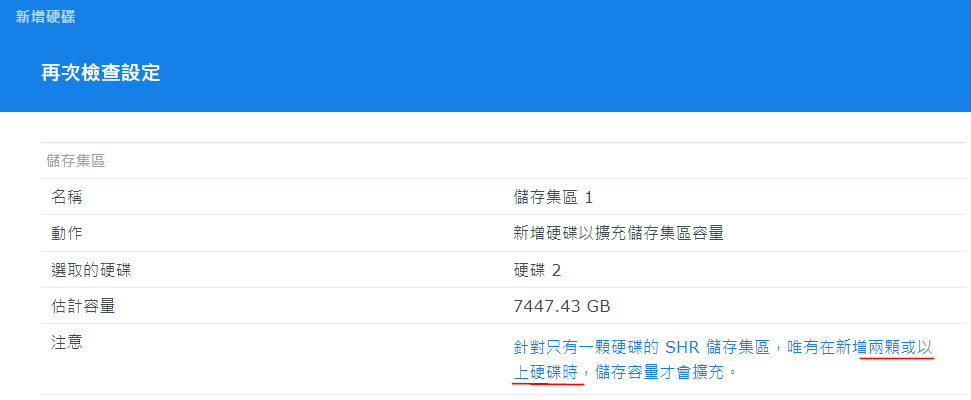
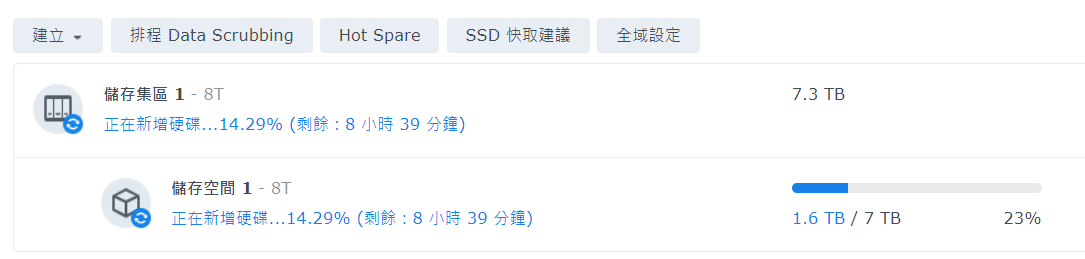
Synology иҮӘ家зҡ„ RAID Format - SHR, F1
SHR
[1]
Classic RAID creates the storage volume based upon the smallest disk within the array.
Unlike Classic RAID, SHR divides each drive volume into smaller chunks and creates additional redundant storage.
By using SHR, you can use the unavailable volume as smaller usable chunks,
therefore maximizing storage capacity of each drive.
[2]
Unlike Classic RAID, SHR makes the newly upgraded storage readily available for use.
If the drives are replaced with larger ones,
the upgraded storage can be used as soon as two of the disks are upgraded to form a redundant storage array.
Singe Disk to RAID1 (DSM 7.2)
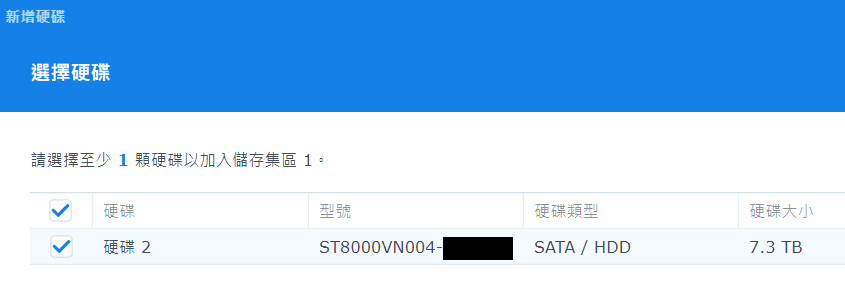
# SHR дёҠз”ұе–®зўҹеҲ°йӣҷзўҹеҸӘжңғжҲҗзӮә RAID1
# еҚҒеӨҡеҲҶйҚҫеҫҢе°ұй–Ӣе§ӢзңӢеҲ°еҗҢжӯҘжғ…жіҒ (е®ғжҳҜдёҖеҖӢ Linux MD RAID дҫҶ)
RAID F1
е®ғжҳҜдёҖзЁ®зӮә SSD еҹәж–ј RAID 5 иЁӯиЁҲиҖҢжҲҗзҡ„ RAID
F жҳҜжҢҮ Flash, иҖҢ 1 жҳҜжҢҮд»Ҙе–®дёҖ SSD зӮәйӣҶдёӯеҜ«е…Ҙе®№йҢҜдҪҚе…ғ
=> зӣЎеҸҜиғҪд»ҘжҜҸж¬ЎдёҖеҸ°, иҖҢйқһдёҖеӨ§жү№ SSD ж•…йҡң
еҺҹзҗҶ:
differs from RAID 5 by selecting one SSD in the array for distribution of additional parity bits,
effectively writing more data to one SSD than to others in the group.
=> allows for a single disk to complete its estimated life cycle before any others in the array.
This provides a single, predictable failure point, which is within the fault tolerance of the array.
App Version
Synology Package Version дҝӮиҰҒи·ҹ DSM Version зҡ„ !!
https://archive.synology.com/download/Package/Git/
i.e. DSM 6.2.3-25426 Update 3 еҸӘеҸҜд»ҘиЈқ 2.33.0-0126 дҪҶе®үе””еҲ° 2.33.0-1016
PhotoStation
Help
https://www.synology.com/zh-tw/knowledgebase/DSM/help/PhotoStation/photo
зӣёи–„зҡ„иіҮж–ҷеӨҫ
"home/photo"
"Photo Station Uploader"
и©ІеҠҹиғҪжңғйҒӢз”Ёйӣ»и…Ұзҡ„зі»зөұиіҮжәҗдҫҶд»Ҙијғеҝ«зҡ„йҖҹеәҰз”ўз”ҹзё®ең–дёҰеЈ“зё®еҪұзүҮ
ж¬Ҡйҷҗ
зҖҸиҰҪиҮіжӮЁиҰҒз·ЁијҜзҡ„зӣёз°ҝгҖӮ
жҢүдёҖдёӢжӣҙеӨҡдҫҶдҝ®ж”№иіҮиЁҠгҖҒзӣёз°ҝж¬ҠйҷҗеҸҠдҪҝз”ЁиҖ…еңЁзӣёз°ҝдёӯеҹ·иЎҢзү№е®ҡд»»еӢҷзҡ„ж¬Ҡйҷҗ
иӢҘиҰҒдёҖж¬Ўз·ЁијҜе…ЁйғЁзҸҫжңүзӣёз°ҝзҡ„ж¬ҠйҷҗйЎһеһӢпјҢи«ӢеүҚеҫҖиЁӯе®ҡ > зӣёзүҮдёҰжҢүдёҖдёӢеӯҳеҸ–ж¬ҠйҷҗгҖӮ
ж¬ҠйҷҗйЎһеһӢеҰӮдёӢ:
е…¬й–Ӣзӣёз°ҝпјҡжүҖжңүи§ҖзңӢиҖ…зҡҶеҸҜжӘўиҰ–жӯӨзӣёз°ҝгҖӮ
з§Ғдәәзӣёз°ҝпјҡж“ҒжңүйҒ©з•¶еӯҳеҸ–ж¬Ҡйҷҗзҡ„дҪҝз”ЁиҖ…еҸҜд»ҘжӘўиҰ–жӯӨзӣёз°ҝгҖӮ
еҜҶзўјйҺ–е®ҡпјҡеҰӮжһңжӮЁйҒёж“ҮжӯӨйҒёй …пјҢи«ӢеңЁеҜҶзўјжЁҷй ӯдёӢж–№ијёе…ҘеҜҶзўјгҖӮйҷӨйқһдҪҝз”ЁиҖ…ијёе…ҘжӯЈзўәзҡ„еҜҶзўјдҫҶи§ЈйҺ–зӣёз°ҝпјҢеҗҰеүҮжӯӨзӣёз°ҝжңғиў«йҺ–е®ҡгҖӮ
Time Machine Backup (иҲҠ)
1 Create a user for Time Machine and set quota limit
2 Create a shared folder for Time Machine backup
3 Set the shared folder as Time Machine's backup target
Control Panel -> File Services
AFP Section -> Enable AFP service
* port 548/tcp
Advanced Tab -> Enable Bonjour Time Machine broadcast via AFP -> Set Time Machine Folders
Cloud Station Server
!! Cloud Station will save the historical version in the database.
so If you have kept the database during uninstall the Cloud Station server,
the storage space will not be released even though you uninstall the application.
=> "@cloudstation" Folder жңғж„ҲдҫҶж„ҲеӨ§
If you did not remove the database when you uninstalled,
re-install, uninstall, click "Please DO NOT keep the database this time."
Deleting all the historical versions to reclaim space
Open "Cloud Station Server" -> Go to Overview from the left menu -> Open "Version Explorer"
For each folder on the left menu execute "Action" - "Clear version database"
Cloud Station Backup
Client Side:
Package: Synology Cloud Station Backup
* set backup rules
Web Panel: Version Explorer
- Manage backed up files and historical versions
The following file types and drive types are not supported in Cloud Station Backup:
Windows folders with these attributes:
- Hidden files
- OFFLINE
- REPARSE_POINT
- SYSTEM
- TEMPORARY
=================
NAS Side:
Package: Install "Cloud Station Server"
Folder permission: R/W
Applications permission: Cloud Station Server
Settings
Cloud Station Server -> Settings -> Sync Settings -> Enable жҹҗ folder
Cloud Station Server -> Settings -> Others -> Database Location
CloudSync
https://www.synology.com/en-global/knowledgebase/DSM/help/CloudSync/cloudsync
Synology Cloud Station Drive
еҠҹиғҪ
NAS е’ҢеҖӢдәәйӣ»и…Ұд№Ӣй–“еҗҢжӯҘжӘ”жЎҲ
зӣ®зҡ„
еҚідҫҝеңЁжІ’жңүз¶Іи·ҜйҖЈз·ҡзҡ„жғ…жіҒдёӢ, жӮЁдҫқ然еҸҜд»ҘзҖҸиҰҪеҸҠз·ЁијҜжӘ”жЎҲ,
дё”жүҖжңүдҝ®ж”№зҡҶжңғеңЁйҮҚж–°йҖЈдёҠз¶Іи·ҜеҫҢиҮӘеӢ•еҗҢжӯҘиҮіжӮЁзҡ„ NAS еҸҠеҖӢдәәйӣ»и…Ұ
Network
Port: 6690/tcp # з„Ўеҫ—ж”№, еӣ зӮәе®ғжІ’жңүз”Ё Application Porta
Installation
- NAS: Cloud Station Server
- APP: DS cloud
- PC: Synology Cloud Station Drive
PC
йқһе…Ёз¶ tick icon
This icon indicates your file or folder has been downloaded to a local computer and can be viewed offline.
You may right-click on the file, select Synology Drive > Free up space to manually delete the local file and release the space.
However, when your computer is low on disk capacity, these local copies will be automatically deleted to release space.
The icons will change to the cloud icon and these files and folders are still available when online.
е…Ёз¶ tick icon
This icon indicates that the file has been permanently pinned to the local computer and can be viewed offline.
When your computer is low on disk capacity, these permanently pinned copies will not be automatically deleted to release space.
Storage Analyzer
synology check shared folder size
https://www.synology.com/en-us/knowledgebase/DSM/help/StorageAnalyzer/StorageAnalyzer_desc
Synology VMM(Virtual Machine Manager)
Private / External virtual switch
External virtual switch
When you assign multiple physical network interfaces to an external virtual switch,
the system will automatically select a physical network interface to bridge the virtual network interface with,
in order to provide load balancing and fault tolerance.
Private virtual switch
You should choose a host on which the private virtual switch will be created.
To perform live migration of virtual machines, it is required that the destination host is connected to the same
virtual switch as the virtual machine.
btrfs
btrfs creat with one of the following RAID types:
- RAID 1
- RAID 5
- RAID 6
- RAID 10
- RAID F1
- Synology Hybrid RAID (SHR/SHR-2) with more than one drive
Manage
- scrubbing (file self-healing)
- defragmentation
Cloud Station
Btrfs does not require double the storage space for Cloud Station's file versioning and history data.
Quotas
Per shared folders
Data consistency of backups
Clone entire shared folders
Go to Control Panel > Shared Folder.
Select the desired shared folder in Btrfs file system.
Click Create > Clone.
* Only shared folders on Btrfs volumes can be cloned.
Integrity Protection
Enable advanced data integrity protection (Default: Disable. еҸӘжңүеңЁе»әз«Ӣ Folder жҷӮ enable е®ғ([email protected]))
The file self-healing feature is currently available for the shared folders located in a Btrfs volume
Snapshot Replication
iSCSI
Basic Setting
е‘ҪеҗҚ: esxi-lun, esxi-tg, iqn.synology:MyNAS.esxi-tg
еңЁ Synology дёҠе»әз«Ӣ iscsi (lun & target)
е»әз«ӢжӯҘй©ҹ
1. Create iSCSI LUN
# DSM 6.2
iSCSI Manager > iSCSI LUN Tab > Click "Create" Button >
Remark:
- LUN type: File Level
- Space Allocation: Thin Provisioning
2. mapping iSCSI LUNs to iSCSI Targets
LUN type
- iSCSI LUN (File-Level)
- iSCSI LUN (Block-Level)
File-Level LUN
Regular file LUNs
provide better overall I/O performance
Advanced file LUNs
support hardware acceleration commands, including VMware VAAI, Windows ODX, LUN snapshots and
clone to enhance storage efficiency and data protection.
Target Setting
Allow multiple sessions from one or more iSCSI initiators:
For iSCSI MPIO or MC/S, allow multiple sessions or Initiators to communicate with the same Target.
cluster-aware file system, such as VMware Virtual Machine File System(vmfs), or Oracle Clustering File System.
Maximum receive/send segment bytes:
Adjusting the sending or receiving segment frame can yield differences in iSCSI performance.
CRC Checksum
- Header digest
- Data digest
performs a checksum over each iSCSI Protocol Data Unit (PDU)
Mapping
иЁӯе®ҡ target жңүе№ҫеӨҡеҖӢ LUNs
Masking
made accessible or be denied by different iSCSI Initiators, based on the IQN of the iSCSI Initiator
Edit -> Masking -> "Default privileges"
* Default: RW
CHAP
CHAP
Pass: 12~16 Char
Mutual CHAP
require both initiators and Targets to authenticate each other before facilitating communications.
Masking & CHAP е…¶дёӯдёҖжЁЈиӘҚиӯүеӨұж•—йғҪжҳҜе‘ўеҖӢ log
iscsiadm: initiator reported error (24 - iSCSI login failed due to authorization failure)
Settings
Internet Storage Name Service (iSNS)
iSNS protocol allows automated discovery, management and configuration of
iSCSI and Fibre Channel devices (using iFCP gateways) on a TCP/IP network.
iscsi Advanced file LUNs
еңЁ ext4 зҡ„ advanced file LUN жғ…жіҒ:
/volume3/@iSCSI е…§жңү Folder
EP EP_unmap LUN Snapshot tmp
File Fast Clone:
physical data blocks will be copied only upon modification of the cloned files,
which will save storage space
Setting: File Services -> Advanced
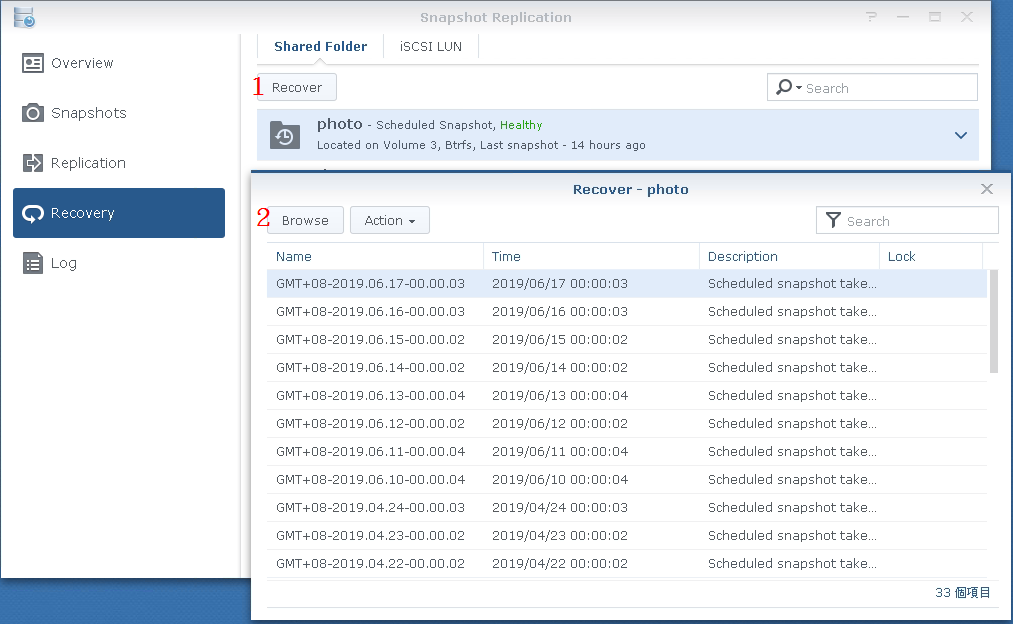
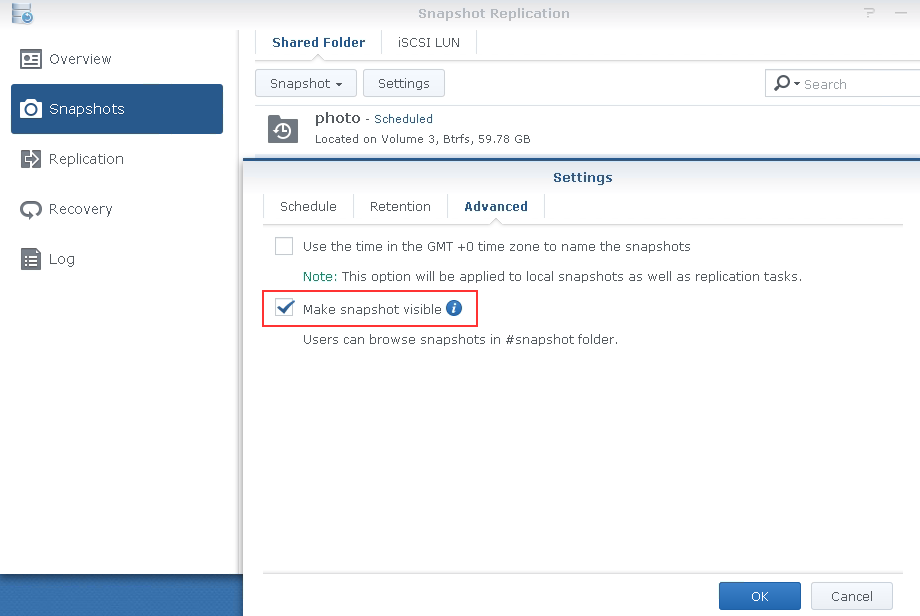
Snapshot
On certain models, you will have to go to Package Center and install "Snapshot Replication"
for functions including restoring iSCSI LUNs, taking and cloning iSCSI LUN snapshots.
Snapshot feature is supported on advanced LUNs only
* If you took a snapshot or created a clone,
and the status turned out to be Abnormal/Crashed,
please delete this snapshot/clone and create another one.
To clone an iSCSI LUN or snapshot:
Snapshot Replication -> Snapshots -> iSCSI LUN
Plugin
Snapshot Manager for X
plugin for Windows Server allows you to create application-consistent snapshots in DSM
Windows
when a snapshot is triggered on DSM,
Synology Snapshot Manager will use the Microsoft Volume Shadow Copy Service (VSS) technology
to produce consistent point-in-time copies of data
VMware
when a snapshot is triggered on DSM, vCenter Server will be notified and
flush all the data from memory to the LUN to guarantee data consistency.
Once the snapshot is complete, vCenter Server will resume normal I/O operation of VMware datastore.
Remark
snapshoot timezone
* Use GMT +0 timezone
Snapshot Replication -> Setting -> Advanced
User Home Service
It is referring to the 'user home service' which you can disable in:
Control Panel -> User -> Advanced -> Enable user home service
The 'homes' folder contains a home folder for each user. The 'home' folder is linked to the relevant folder within 'homes',
ie. if logged in as admin the home folder will be the same as homes/admin.
* Once the local user home service is disabled, the domain user home service will also be disabled concurrently.
Shared Folder Sync
log
ssh nas
grep s2s_syncer /var/log/messages
rsync
當е•ҹеӢ• Synology зҡ„ rsync жңҚеӢҷеҫҢ (當йҒёдәҶ "е•ҹеӢ• rsync жңҚеӢҷ"),
й җиЁӯжҳҜиҰҒйҖҸйҒҺ ssh еҺ» rsync зҡ„ (дёҚжҳҜ 873/tcp).
е®ғжІ’жңү chroot еҲ° share folder, жүҖд»Ҙзӣ®зҡ„ең°иҰҒ Full Path (ie. /volume1/test)
еҚідҪҝ rsyncd жңғиў«е•ҹеӢ•, еҸҠжңү Listen 873/tcp, дҪҶйҖЈ 873 жңғеҮә error
@ERROR: account system disabled
rsync error: error starting client-server protocol (code 5) at main.c(1648) [sender=3.1.2]
иҰҒйҒё "е•ҹеӢ• rsync еёіжҲ¶", д№ӢеҫҢеҠ е…Ҙзӣёе°ҚжҮүзҡ„еёіжҲ¶, йӮЈжүҚйҖЈеҲ° 873/tcp
(DSM жңғз”ҹжҲҗ rsyncd зҡ„ module, дҪҶ)
иҮӘе®ҡ rsyncd
* еҝ…й ҲиЁӯе®ҡ "auth users", еҗҰеүҮ rsyncd жңғжҲҗдәҶз„ЎжҺ©йӣһзұ
* иЁӯе®ҡдәҶ "auth users" еҫҢ, еҝ…й ҲиЁӯе®ҡ "secrets file"
secrets file = /etc/rsyncd.secrets
[test]
    uid = root
    gid = root
    read only = no
    path = /volume1/test
    auth users = datahunter
Note:
* If the backup module and the shared folder share the same name, the backup module setting will be used.
Synology NAS Migration
# Prepare
0. Disable file sharing service on NEW NAS
1. Setup "Shared Folder Sync" on both NAS ( OLD --> NEW )
2. Sync
# Onsite
3. tell ALL user save file
4. Disable file sharing service on OLD NAS ( Or disconnect both NAS from network and link it directly )
5. Sync again
6. import dss file (User ...)
8. Shutdonw OLD NAS & Enable file sharing service on NEW NAS
dss file (Backup)
The configbackup.dss is a tar.gz containing 2 files :
_Syno_UserBkp.db : SQLlite commands to create tables like user_app_privilege_tb, group_id_tb, user_id_tb, and some inserts (users and groups)
configbackup : a text file with user passwords, shares, ...
Resource Monitor - Usage History
historical performance metrics:
Time Range:
- Real Time
- 1 Day
- 1 Week
- 1 Month
- 1 Year
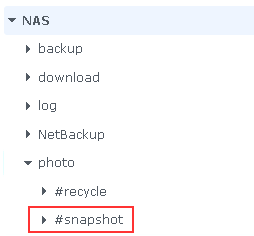
"@eaDir" Folder
This directory is used by the indexing service.
Disable the Service Creating & Delete Them
SSH in as root and run the following
cd /usr/syno/etc.defaults/rc.d/
chmod 000 S66fileindexd.sh S66synoindexd.sh S77synomkthumbd.sh S88synomkflvd.sh S99iTunes.sh
find . -type d -name "@eaDir" -print0 | xargs -0 rm -rf
Update Local SSL Certificate By Script
get_ssl.sh
#!/bin/bash
# иЎҢ letsencrypt зҡ„ server
Server=192.168.123.14
SSL_Path=/etc/letsencrypt/live/datahunter.org/
Local_SSL_Path=/usr/syno/etc/certificate/system/default
cd $Local_SSL_Path
# иҰҒиЁӯе®ҡз”Ё key login
scp $Server:$SSL_Path/chain.pem ./
scp $Server:$SSL_Path/fullchain.pem ./
scp $Server:$SSL_Path/cert.pem ./
scp $Server:$SSL_Path/privkey.pem ./
# restart Application Portal
synoservicectl --reload nginxchmod 700 get_ssl.sh
ssh-keygen -f /root/.ssh/id_rsa -N ''
е°Ү /root/.ssh/id_rsa.pub зҡ„е…§е®№ж”ҫеҲ°е»әз«Ӣ SSL зҡ„ Server дёҠ (/root/.ssh/authorized_keys)
е…¶д»– App зҡ„ SSL
grep ssl /etc/nginx/app.d/server.FileStation.conf
    listen 6001 default_server ssl;
    listen [::]:6001 default_server ssl;
    ssl_certificate /usr/syno/etc/certificate/AppPortal/FileStation_AltPort/fullchain.pem;
    ssl_certificate_key /usr/syno/etc/certificate/AppPortal/FileStation_AltPort/privkey.pem;
rm -f /*.pem
Local_SSL_Path=/usr/syno/etc/certificate/system/default
FS_SSL_Path=/usr/syno/etc/certificate/AppPortal/FileStation_AltPort
ln -s $Local_SSL_Path/fullchain.pem $FS_SSL_Path/fullchain.pem
ln -s $Local_SSL_Path/privkey.pem $FS_SSL_Path/privkey.pem
Log Center
Archive logs(SYNOSYSLOGDB__LOCALARCH.DB)
иҰҒе®ү "log center" е…Ҳжңү Archive еҠҹиғҪ
Local logs (System, Connection, and File Transfer logs) are saved in a system partition (/var/log/synolog)that has limited storage.
By enabling Archive local logs to the storage location specified.
If you did not enable archive log function,
previous log will be deleted when accumulated log exceeds log database's maximum retainable log number.
File Station  20,000
FTP           20,000
SMB           100,000
AFP           20,000
WebDAV        20,000
Settings:
Archive logs as text format in addition to default format:
Saves archives as a plain text files in addition to the default SQLite files.
Archive logs separately according to device:
Saves separate archives for individual client devices that send logs to the Synology NAS.
Transfer Log
File Services -> Enable Transfer Log
File Station -> Settings -> Enable File Station Log
Log File зҡ„дҪҚзҪ®
/var/log/synolog
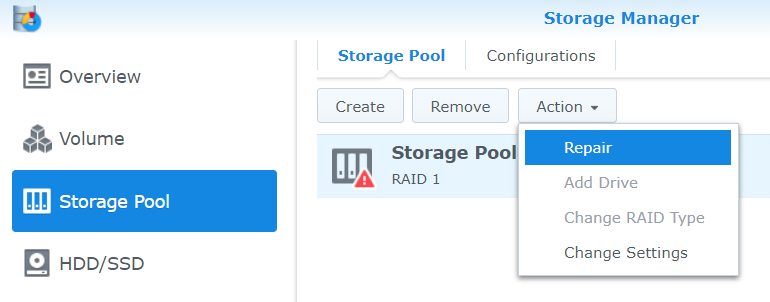
Replace HDD
1) зўәе®ҡйӮЈ HDD жңүе•ҸйЎҢ
Storage Manager -> HDD/SSD -> Select HDD -> Action -> Switch Drive Indicator Status
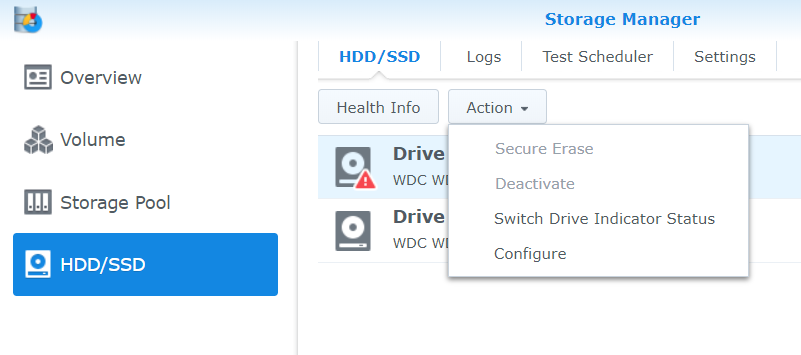
Set the amount of time the drive indicator remains "alert" for, which can be between 1 minute and 60 minutes.
иЁӯе®ҡеҫҢ HDD зҡ„ LED жңғ з¶ -> ж©ҷ
2) жҸӣеҘҪ HDD еҫҢ Repair RAID
* The size of the replacement drive must be larger or equal to the size of the smallest drive in the storage pool.
* The status of the drive for replacement must be Initialized (已經 Sync еҘҪ OS) or Not Initialized.
Storage Manager -> Storage Pool -> Select "Pool" -> Action -> Repair
Select the replacement drive which you would like to add to the volume.
Ugrage RAID Level
ж”ҜжҸҙ Upgrade зЁӢеәҰ
- Basic -> RAID 1 / RAID 5
- RAID 1 -> RAID 5
- RAID 5 -> RAID 6
- SHR-1 -> SHR-2
Step
- Open "Storage Manager"
- Go to "Storage Pool" Tab
- Select the storage pool you wish to change and ->"Action" drop-down menu -> click "Change RAID Type"
PetaSpace (Add-on)
е°ҮеӨҡеҖӢ volumes еҗҲдҪөзӮәдёҖеҖӢеӨ§еһӢзҡ„ volume
* 2 bay nas жІ’жңүжӯӨ Add-on
UPNP
External Access
Scheduling a Task
/root/scrpits/get_ssl.sh
Scheduling a Task on a Synology NAS
Control Panel > Task Scheduler > Create > Scheduled Task > User-defined scripts
Disk Space Warning
Control Panel > Notifications > Advanced > "Internal Storage" Section > "Volume in low capacity" item
My Settins
Every time when volume capacity drops 1% below = "critical" value
When volume capacity drops below = "warning" value
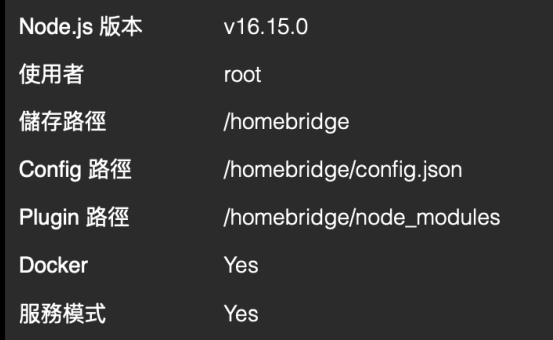
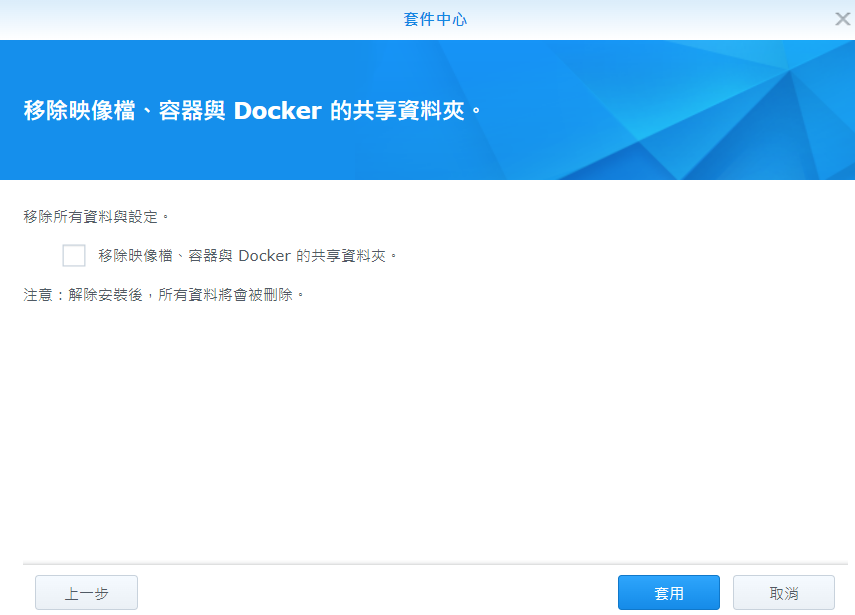
Docker
512n & 4K native drive
a non-4K native drive can only replace a non-4K native drive.
=> You can mix 512n and 512e, but not 4kn with 512n/e
е®үе…ЁиЁӯе®ҡ: иҮӘеӢ•е°ҒйҺ– & дҝЎд»»з”ЁжҲ¶з«Ҝ
еңЁжҺ§еҲ¶еҸ°пјҲControl Panelпјү > е®үе…ЁжҖ§пјҲSecurityпјү > иҮӘеӢ•е°ҒйҺ–пјҲAuto BlockпјүеҸҜйҖІиЎҢиҮӘеӢ•е°ҒйҺ–зҡ„иЁӯе®ҡ
иҮӘеӢ•е°ҒйҺ–(IP)
йҒ©з”Ёж–јйҖҸйҒҺ
- SRM
- SSH
- FTP
- WebDAV
- File Station
- Download Station
- VPN Server
- Synology иЎҢеӢ•жҮүз”ЁзЁӢејҸ
дҝЎд»»з”ЁжҲ¶з«Ҝ
дҝЎд»»з”ЁжҲ¶з«Ҝ: еҸӘиҰҒи©Із”ЁжҲ¶з«Ҝжӣҫ經жҲҗеҠҹзҷ»е…Ҙ, дҫҝе°Үж°ёйҒ еҸ—дҝЎд»»
DSM жЎҢйқўеҸідёҠи§’зҡ„дәәеҪўең–зӨә > еҖӢдәәиЁӯе®ҡ
Troubleshoot
[1] Synology smb ghost folder
еҫөзӢҖ
- йӮЈ ghost folder е””иғҪеӨ access
- жҢү "жё…йҷӨ SMB еҝ«еҸ–" и§Јжұәе””еҲ°
- е»әз«ӢеҗҢеҗҚ Share д№ӢеҫҢеҶҚеҲӘйҷӨдҫқ然еӯҳеңЁ
Fix
дҝ®ж”№ /etc/samba/smb.conf дёҰеҲӘйҷӨйӮЈ Share
/sbin/restart smbd
smbd start/running, process 9494
жё…йҷӨ SMB еҝ«еҸ–
жҢүдёҖдёӢжӯӨжҢүйҲ•дҫҶеҲӘйҷӨд»ҘдёӢ SMB еҝ«еҸ–жӘ”жЎҲд»ҘдҪңзӮәз–‘йӣЈжҺ’и§Јд№Ӣз”Ёпјҡ
- /var/cache/samba/netsamlogon_cache.tdb
- /var/lib/samba/winbindd_cache.tdb
- /var/lib/samba/share_info.tdb
- /var/lib/samba/registry.tdb
- /run/samba/connections.tdb
- /run/samba/gencacche.tdb
- /run/samba/gencache_notran.tdb