жңҖеҫҢжӣҙж–°: 2021-09-20
зӣ®йҢ„
- DSM 6 - Install
- Sata Port иЁӯе®ҡ
- Disk Layout
- Update DSM
-
DSM ssh дҪҝз”Ёеҝғеҫ—
- Disable apparmor
- List & Restart Service
- synouser
- иЁӯе®ҡ alias
- root зҡ„ default shell жҳҜ /bin/ash - Set IP by Command
- Update SSL Certicate By Script
- To expand the size of a volume
- Troubleshoot
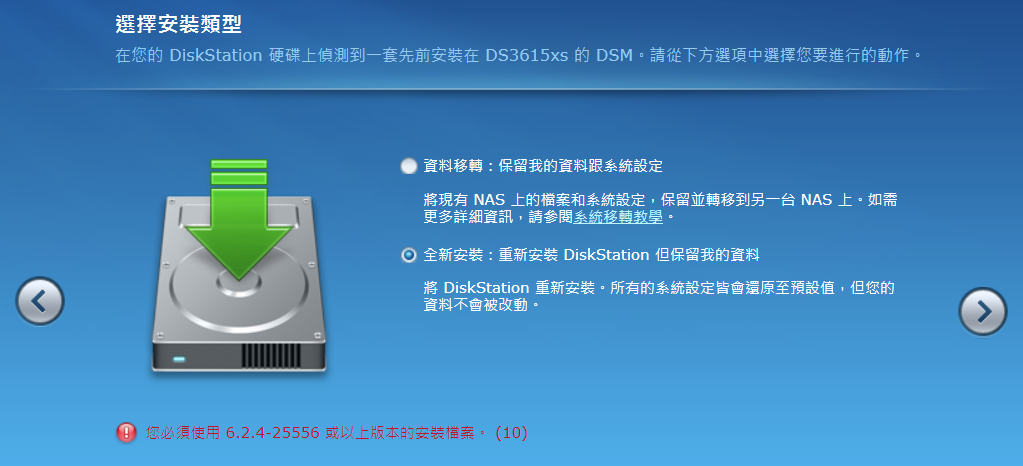
DSM 6 - Install
Loader иҲҮ DSM е°Қз…§
Loader DSM 1.03b ==> 6.2.X 1.02b ==> 6.1.3-X (дёҚйҒ©з”Ёж–ј 6.2.X) 1.01 ==> 6.0.2 (дёҚйҒ©з”Ёж–ј 6.0.3)
Loader DL:
https://xpenology.com/forum/topic/6253-dsm-6xx-loader/
DSM Download:
releaseNote
Download
VM Setting (KVM)
NIC
<model type='e1000'/>
serial_generator
https://xpenogen.github.io/serial_generator/index.html
DS3615xs
1330LWN478880
1130LWN949484
1430LWN976412
Setting (MAC, SN)
[Default]
еңЁе®үиЈқ DSM еүҚ, Search еҲ°зҡ„ MAC/SN дёҚжҳҜжҲ‘еҖ‘иҮӘе®ҡйӮЈеҖӢ (жҜҸж¬Ў Start йғҪ RANDOM)
[ж–№жі•1] дҝ®ж”№ synoboot.img е…§зҡ„ grub.cfg
parted synoboot.img print
Model:  (file)
Disk /ssd/xpenology/synoboot.img: 52.4MB
Sector size (logical/physical): 512B/512B
Partition Table: gpt
Disk Flags:
Number  Start   End     Size    File system  Name    Flags
 1      1049kB  16.8MB  15.7MB  fat16        boot    boot, esp
 2      16.8MB  48.2MB  31.5MB  fat16        image
 3      48.2MB  52.4MB  4177kB               legacy  bios_grub
losetup -f # жүҫеҮәдёӢдёҖеҖӢжңӘз”Ёзҡ„ loop device
losetup /dev/loop1 synoboot.img
partprobe /dev/loop1 # detect loop1 дёҠзҡ„ partition, дёҰз”ҹжҲҗ loop1p1 ...
ls /dev/loop1*
/dev/loop1 /dev/loop1p1 /dev/loop1p2 /dev/loop1p3
mkdir /mnt/tmp
mount /dev/loop1p1 /mnt/tmp
дҝ®ж”№ /mnt/tmp/grub/grub.cfg
umount /mnt/tmp
losetup -d /dev/loop1
* еҰӮжһң synoboot.img жҳҜз”Ё USB Stick , йӮЈе°ұиҰҒдҝ®ж”№ vid, pid
set vid=0x058f
set pid=0x6387
set sn=?????????????
set mac1=00112233445566

set default='0'
set timeout='3'
[ж–№жі•2] Boot cmd
Grub Boot Menu -> "C"
grub> sn ?????????????
grub> mac1 00112233445566
esc -> Enter
Upload DSM
з”Ё firefox жү“й–Ӣ http://find.synology.com жүҫеҮә NAS зҡ„ IP
д№ӢеҫҢе…Ҙ http://x.x.x.x:5000
еҶҚйҒё"жүӢеӢ•е®үиЈқ" -> upload е·І dl еҘҪзҡ„ dsm package
Sata Port иЁӯе®ҡ
GUI е…§зҡ„ Disk Number
ls -l /sys/block/sd*
... /sys/block/sda -> ../devices/pci0000:00/0000:00:05.0/ata1/host0/target0:0:0/0:0:0:0/block/sda
... /sys/block/sdg -> ../devices/pci0000:00/0000:00:06.0/ata7/host6/target6:0:0/6:0:0:0/block/sdg
... /sys/block/sdh -> ../devices/pci0000:00/0000:00:06.0/ata8/host7/target7:0:0/7:0:0:0/block/sdh
... /sys/block/sdi -> ../devices/pci0000:00/0000:00:06.0/ata9/host8/target8:0:0/8:0:0:0/block/sdi
... /sys/block/sdj -> ../devices/pci0000:00/0000:00:06.0/ata10/host9/target9:0:0/9:0:0:0/block/sdj
... /sys/block/sdk -> ../devices/pci0000:00/0000:00:06.0/ata11/host10/target10:0:0/10:0:0:0/block/sdk
... /sys/block/sdl -> ../devices/pci0000:00/0000:00:06.0/ata12/host11/target11:0:0/11:0:0:0/block/sdl
* дёҖејө KVM SATA Controller ж”ҜжҸҙ 6 еҖӢ sata port (Controller1=00:05.0, Controller2=00:06.0)
* sd? жҳҜеӣәе®ҡзҡ„ 1->a, 2->b, 3->c ...7->g, 8->h
VM дёҠзҡ„ SATA е»әиӯ°иЁӯе®ҡ
еңЁ VM е»әз«Ӣ 2 еҖӢ SATA Controller
Bootloader image(redpill.img) ж”ҫеңЁ controller 0:0
Data disk(disk.qcow2) ж”ҫеңЁ controller 1:0
XML
<devices>
  <disk type='file' device='disk'>
    <driver name='qemu' type='raw'/>
    <source file='/kvm/vm/redpill/redpill.img'/>
    <target dev='sda' bus='sata'/>
    <address type='drive' controller='0' bus='0' target='0' unit='0'/>
  </disk>
  <disk type='file' device='disk'>
    <driver name='qemu' type='qcow2'/>
    <source file='/kvm/vm/redpill/disk.qcow2'/>
    <target dev='sdb' bus='sata'/>
    <address type='drive' controller='1' bus='0' target='0' unit='0'/>
  </disk>
</devices>
SATAPortMap
It is normally used to gain access to disk slots that aren't accessible with the default detection.
forces the sata hoststo initialize specified number of ports.
This makes the disk name not skip some characters.
# means first 4 ports of 1st controler, 2 ports of 2nd controler and 2 ports of 3rd controler.
SataPortMap=422
* Do NOT set the port number out of the range that [0-9]
DiskIdxMap
DiskIdxMap=XXYYZZ
HEXadecimal number:
- XX is the location of first disk of 1st controller,
- YY is the location of first disk of 2nd controller,
- ZZ is the location of first disk of 3rd controller
* This argument is a hex string and is related with SataPortMap
For example
# means the disk name of the first host start from sdd, the second host start from sdq, and the third host start sda.
DiskIdxMap=030600
sata_remap
sata_remap=0>4:4>0
For example, sata_remap=0>4:4>0 means swap the first disk name and the 5th.
The following is the remap result.
ata1 – sde
ata2 – sdb
ata3 – sdc
ata4 – sdd
ata5 – sda
Disk Layout
зі»зөұдёҖе…ұжңүе…©йҡ» Disk, еҲҶеҲҘжҳҜ sdb (20G), sdc (100G)
жҜҸж¬ЎеҠ Disk жҷӮ, зі»зөұдәҰжңғ RAID е·Ұ partition 1 еҸҠ 2
Disk /dev/sdb: 20 GiB, 21474836480 bytes, 41943040 sectors
Units: sectors of 1 * 512 = 512 bytes
Sector size (logical/physical): 512 bytes / 512 bytes
I/O size (minimum/optimal): 512 bytes / 512 bytes
Disklabel type: dos
Disk identifier: 0x0007cab1

Device     Boot   Start      End  Sectors  Size Id Type
/dev/sdb1          2048  4982527  4980480  2.4G fd Linux raid autodetect
/dev/sdb2       4982528  9176831  4194304    2G fd Linux raid autodetect
/dev/sdb3       9437184 41738239 32301056 15.4G fd Linux raid autodetect


Disk /dev/sdc: 100 GiB, 107374182400 bytes, 209715200 sectors
Units: sectors of 1 * 512 = 512 bytes
Sector size (logical/physical): 512 bytes / 512 bytes
I/O size (minimum/optimal): 512 bytes / 512 bytes
Disklabel type: dos
Disk identifier: 0x00076681

Device     Boot   Start       End   Sectors  Size Id Type
/dev/sdc1          2048   4982527   4980480  2.4G fd Linux raid autodetect
/dev/sdc2       4982528   9176831   4194304    2G fd Linux raid autodetect
/dev/sdc3       9437184 209510399 200073216 95.4G fd Linux raid autodetect
Update DSM
зӣ®йҢ„
- DSM 6.1
DSM 6.1
DSM 6.1 ж”ҜжҢҒ Btrfs FS
Instant SMB server-side copy (Btrfs fast-clone technology)
Virtual DSM will virtualize another DSM OS. One master dsm will control every "kagebushin" DSM.
Mailplus will be free until a certain number of user, after that, licence fee
Videostation : offline transcoding (will allow to convert videos normally unreadable on device), several flux simultaneously, to chromecast and dlna device for example
Universal Search (Ctrl+F)
Resource Monitor
64-bit architecture
Modular management of the packages (you will be able to update independantly php and apache for example)
The High Availability Manager server is now able to handle split-brain errors a lot better and it doesn’t require a full data replication anymore to get back up and running.
DSM ssh дҪҝз”Ёеҝғеҫ—
Disable apparmor
/usr/syno/etc.defaults/rc.sysv/apparmor.sh stop
List & Restart Service
synoservicecfg --list
synoservicectl --status pkgctl-WebStation
synoservicecfg --restart nginx
synouser
# Get user info
synouser --get admin
User Name   : [admin]
User Type   : [AUTH_LOCAL]
User uid    : [1024]
Primary gid : [100]
Fullname    : [System default user]
User Dir    : [/var/services/homes/admin]
User Shell  : [/bin/sh]
Expired     : [true]
User Mail   : []
Alloc Size  : [125]
Member Of   : [2]
(100) users
(101) administrators
# Set / Reset Pass
synouser --setpw username newpasswd
# Modify User
synouser --modify username "full name" expired email
i.e. Enable admin A/C
synouser --modify admin '' 0 ''
иЁӯе®ҡ alias
alias less='vi -R -'
root зҡ„ default shell жҳҜ /bin/ash
# 1: жҹҘзңӢзі»зөұиЎҢеҲ° bash е—Һ?
grep bash /etc/shells
ls -l /bin/bash
# 2: иЁӯе®ҡз”Ё bash sh
vi /etc/passwd
root:x:0:0::/root:/bin/bash
synouser --rebuild
synouser -get root | grep Shell
User Shell : [/bin/bash]
* дёҚе»әиӯ°жҠҠ /bin/sh softlink еҲ° bash, еӣ зӮәе’ҒжңғеҪұйҹҝзі»зөұиЎҢ script
Set IP by Command
DSM: 6.1
# иЁӯе®ҡ IP
vi /etc/sysconfig/network-scripts/ifcfg-eth0
DEVICE=eth0 BOOTPROTO=static ONBOOT=yes IPV6INIT=off IPADDR=x.x.x.x NETMASK=y.y.y.y # GATEWAY=z.z.z.z <-- жӯӨ config file дёҚж”ҜжҸҙиЁӯе®ҡ GATEWAY
# GATEWAY еҸҠ DNS иҰҒеңЁд»ҘдёӢ file иЁӯе®ҡ
/etc/iproute2/config/gateway_database
[eth0]
        dns=8.8.8.8
        gateway=z.z.z.z
        dns_v6=
# еҘ—з”Ё setting
/etc/rc.network restart
Update SSL Certicate By Script
# On NAS
/root/.ssh/config
Host nginx
 HostName 192.168.123.14
 Port 22
 IdentitiesOnly yes
 IdentityFile /root/.ssh/nginx.key
/root/scripts/getssl/run.sh
#!/bin/bash

_DOMAIN="datahunter.org"
_HOST="nginx"
_SSL_PATH="/usr/syno/etc/certificate/system/default"

mkdir -p /root/scripts/getssl
chmod 700 /root/scripts/getssl
cd /root/scripts/getssl

scp -pr nginx:/etc/letsencrypt/live/$_DOMAIN ./ > /dev/null 2>&1

chmod 400 $_DOMAIN/privkey.pem
mv -f $_DOMAIN/privkey.pem       $_SSL_PATH/privkey.pem
mv -f $_DOMAIN/fullchain.pem     $_SSL_PATH/fullchain.pem

rm -rf $_DOMAIN

nginx -s reload

echo "Done"
To expand the size of a volume
ж–№жЎҲ1: Expand by add disk
For volumes created on a storage pool with multiple volume support -SHR (higher flexibility)
Select the volume you want to expand.
Click Action > Configure.
Enter the new size in the Modify allocated size (GB) field and click OK.
ж–№жЎҲ2: Expand HDD in ESXi
Synology expand storage pool:
DSM only does an automatic expansion when a drive add/replace event occurs.
(DSM is really intended to manage the drives directly instead of ESXi or a RAID controller)
expand the partition has varying levels of complexity depending upon the array type
* CLI иҰҒеңЁ DSM е…§еҹ·иЎҢ, дёҚиҰҒеңЁ LiveCD дёҠиЎҢ, еҗҰеүҮжңғжңүж©ҹжңғйҮҚе®ү DSM
i.e. A Basic, single disk ext4
[1] з”ұ Volume жүҫеҮә Pool
df | fgrep volume2
/dev/md3 4118539472 1236 4118521656 1% /volume2
[2] з”ұ Pool жүҫеҮә Device
mdadm --detail /dev/md3 | fgrep /dev
/dev/md3:
       0       8       35        0      active sync   /dev/sdc3
[3] Stop All Synology Service
syno_poweroff_task -d
* -d => debug
* жӯӨ CMD жңғиҮӘеӢ• umount /volume
[4] Stop Pool (md)
mdadm --stop /dev/md3
mdadm: stopped /dev/md3
[5] Resize Partition
# Delete partition 3 from array host disk and create a new one to use all the available space
# Creates a new partition, without creating a new file system on that partition.
fdisk /dev/sdc
Command (m for help): p ... Step 1
Command (m for help): d
Partition number (1-3, default 3): 3
Command (m for help): n
Partition number (3-128, default 3):
First sector (9176832-10737418206, default 9177088): 9437184 # з”ұ step 1 зҚІеҫ—, дёҖиҲ¬д№ҹжҳҜ 9437184
Last sector, +sectors or +size{K,M,G,T,P} (9437184-10737418206, default 10737418206):
Command (m for help): t
Partition number (1-3, default 3):
Hex code (type L to list all codes): 21
Command (m for help): p
Command (m for help): wRemark
- type: dos => fd Linux raid auto
- type: gpt => 21 Linux RAID
[6] reboot
reboot
[7] Expand Pool & Volume
CLI
- mdadm --grow /dev/md3 --size=max
- resize2fs -f /dev/md3
GUI
# DSM 6.2
Storage Manager > Storage Pool Tab > Select YourStoragePool > Action > expand
Troubleshoot
1) Upgrade Fail
жғ…жіҒ: "е…Ёж–°е®үиЈқ"зі»зөұд№ҹеӨұж•—
еҺҹеӣ : Partition жңү DSM зі»зөұ
[Fix]
# reboot xpenology with LiveCD
losetup -f /dev/vg3t/xpenology
wipefs -a /dev/loopXp1
losetup -d /dev/loopX
# reboot е…Ҙ DSM
д№ӢеҫҢжңғжҸҗзӨәйҮҚе®ү DSM (жӯӨдёҚжңғеҪұйҹҝ data, еҸӘжңғеҪұйҹҝ Setting)
2) Upgrade to DSM 6.2.3 Fail
Check
ls /dev/synoboot*
/dev/synoboot /dev/synoboot1 /dev/synoboot2
Fix
cp /volume1/folder/FixSynoboot.sh /usr/local/etc/rc.d
chmod 0755 /usr/local/etc/rc.d/FixSynoboot.sh
Reason
DSM 6.2.3: The upgrade changes at least two fundamental DSM behaviors:
[1]
SATA devices that are mapped beyond the MaxDisks limit no longer are suppressed
(including the loader)
[2]
The disk port configuration bitmasks are rewritten in synoinfo.conf:
internalportcfg, usbportcfg and esataportcfg and on 1.04b,
do not match up with the default MaxDisks=16 anymore (or if you have modified MaxDisks).
NOTE: If you have more than 12 disks, it will probably break your array and you will need to restore the values of those parameters
[more info.]
Setting the PID/VID for a baremetal install allows Jun's loader to pretend that the USB key is a genuine Synology flash loader.
On an ESXi install, there is no USB key - instead, the loader runs a script to find its own boot device,
and then remakes it as /dev/synoboot. This was very reliable on 6.1.x and Jun's loader 1.02b.
But moving to DSM 6.2.x and loaders 1.03b and 1.04b,
there are circumstances when /dev/synoboot is created and the original boot device is not suppressed.
The result is that sometimes the loader device is visible in Storage Manager.
Someone found that if the controller was mapped beyond the maximum number of disk devices (MaxDisks),
any errant /dev/sd boot device was suppressed.
Adjusting DiskIdxMap became an alternative way to "hide" the loader device on ESXi and Jun's latest loaders use this technique.